
Starting your own website can be really stressful. There are many options you may be tempted to go with, and rightly so. Different platforms will offer different benefits.
I have always hosted my impulse business and personal websites on my own shared reseller hosting account. My main stack in the past has always been CPanel and Wordpress. I recently came across Ghost, and it has been a game changer for my main website.
I have always wanted to be able to host my website on my own machines and since Ghost can be spun up on literally any ubuntu virtual machine, I decided to do it on Digital Ocean for its speed and reliability (Plus I have a student credit with GitHub!). In the future, I plan to transition the website to my own lab - be on the lookout for an updated tutorial on how to do this on your own home server!
Running my own ghost site was a random weekend obsession I fell into, so I am sharing it in the hopes that it will save another poor soul countless hours of frustration of figuring it out.
Treat this as an answer key to your self hosted ghost problems.
The Stack
In this section I would like to clarify my website stack:
- Ghost - Content Management System.
- Cloudflare - Creates a proxy IP to your website. Helps protect your website by adding another layer of protection.
- Namecheap - Domain Name Registrar.
- Digital Ocean - Server Hosting.
Namecheap - Domain Name
I used Namecheap to buy my domain name. I have used it for a very long time, I have used it heavily to purchase impulse business ideas for many years. It is nice, simple and easy - Not much else to it.
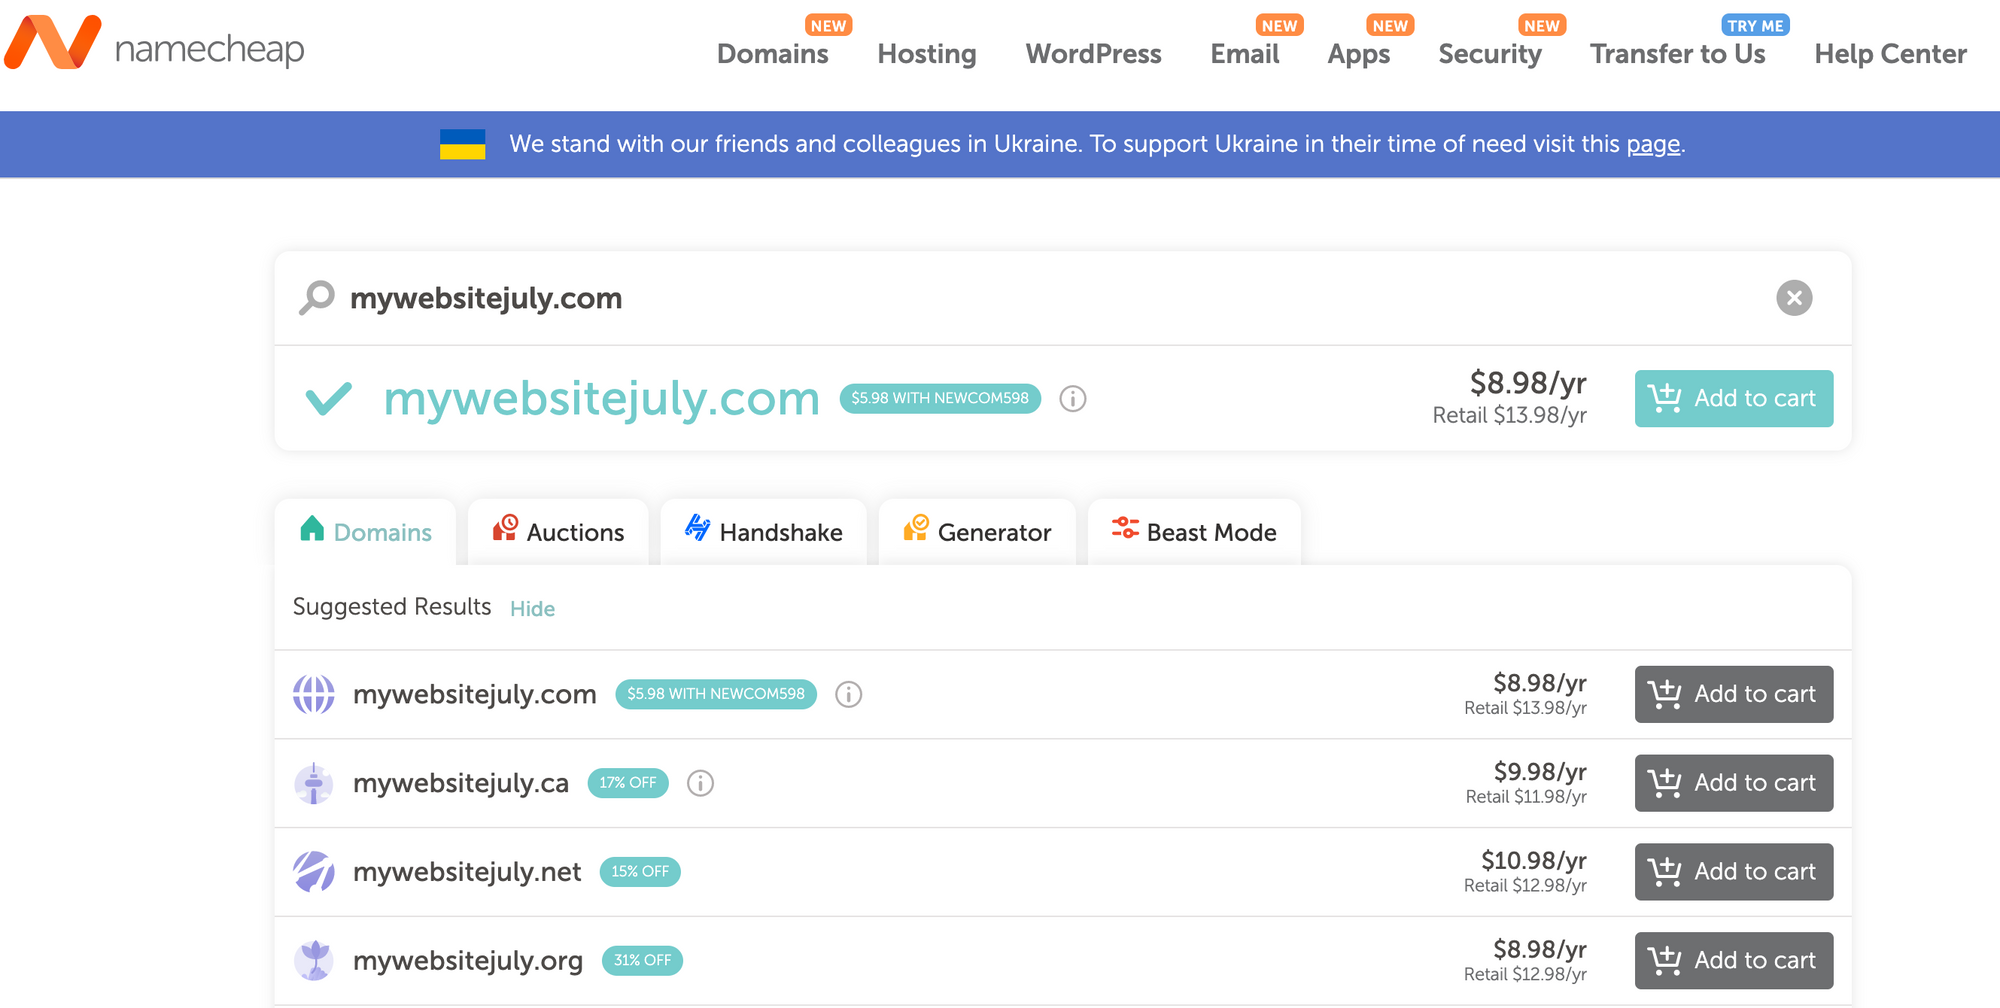
Feel free to use your own domain provider, the following steps will work even if you used other providers such as domains.google. Once you have purchased and registered your domain name, you can move onto the next step of getting digital ocean set up.
CloudFlare - SSL and CDN
I like CloudFlare, there are plenty of resources on what it does and why you should use it. Here is why I like to use CloudFlare
- Makes it harder to perform a DDOS attack against your website by creating a proxy link to your site.
- Offers a free Global Content Delivery Network to improve the performance of your site.
- Allows you to create SSL certificates that never expire.
You're going to want to create a free account and go through the process of adding a site.
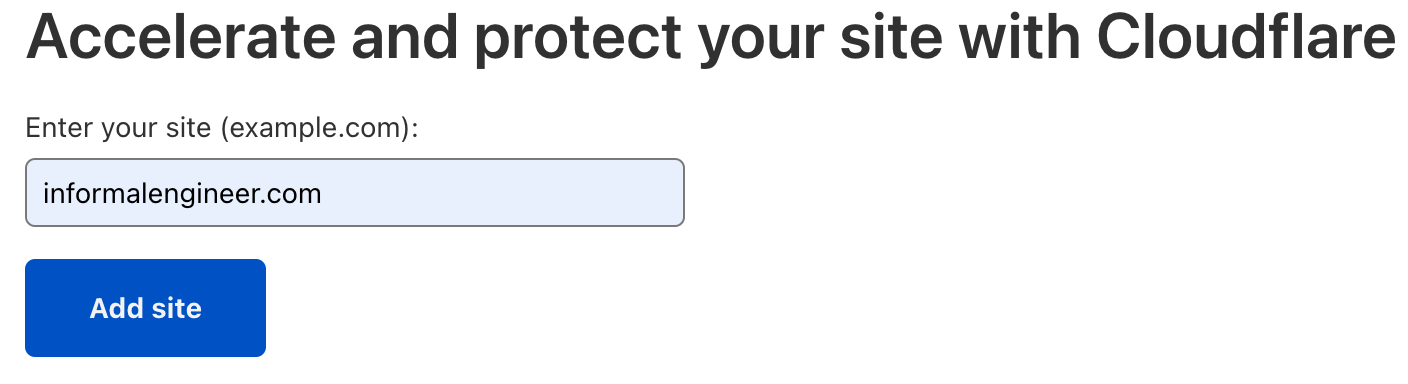
CloudFlare makes the free option a little hard to find, it will be below all of the paid options:

After you do this, the site will ask you to check your records, instead you want to click on the overview tab and follow those instructions on your Namecheap account.
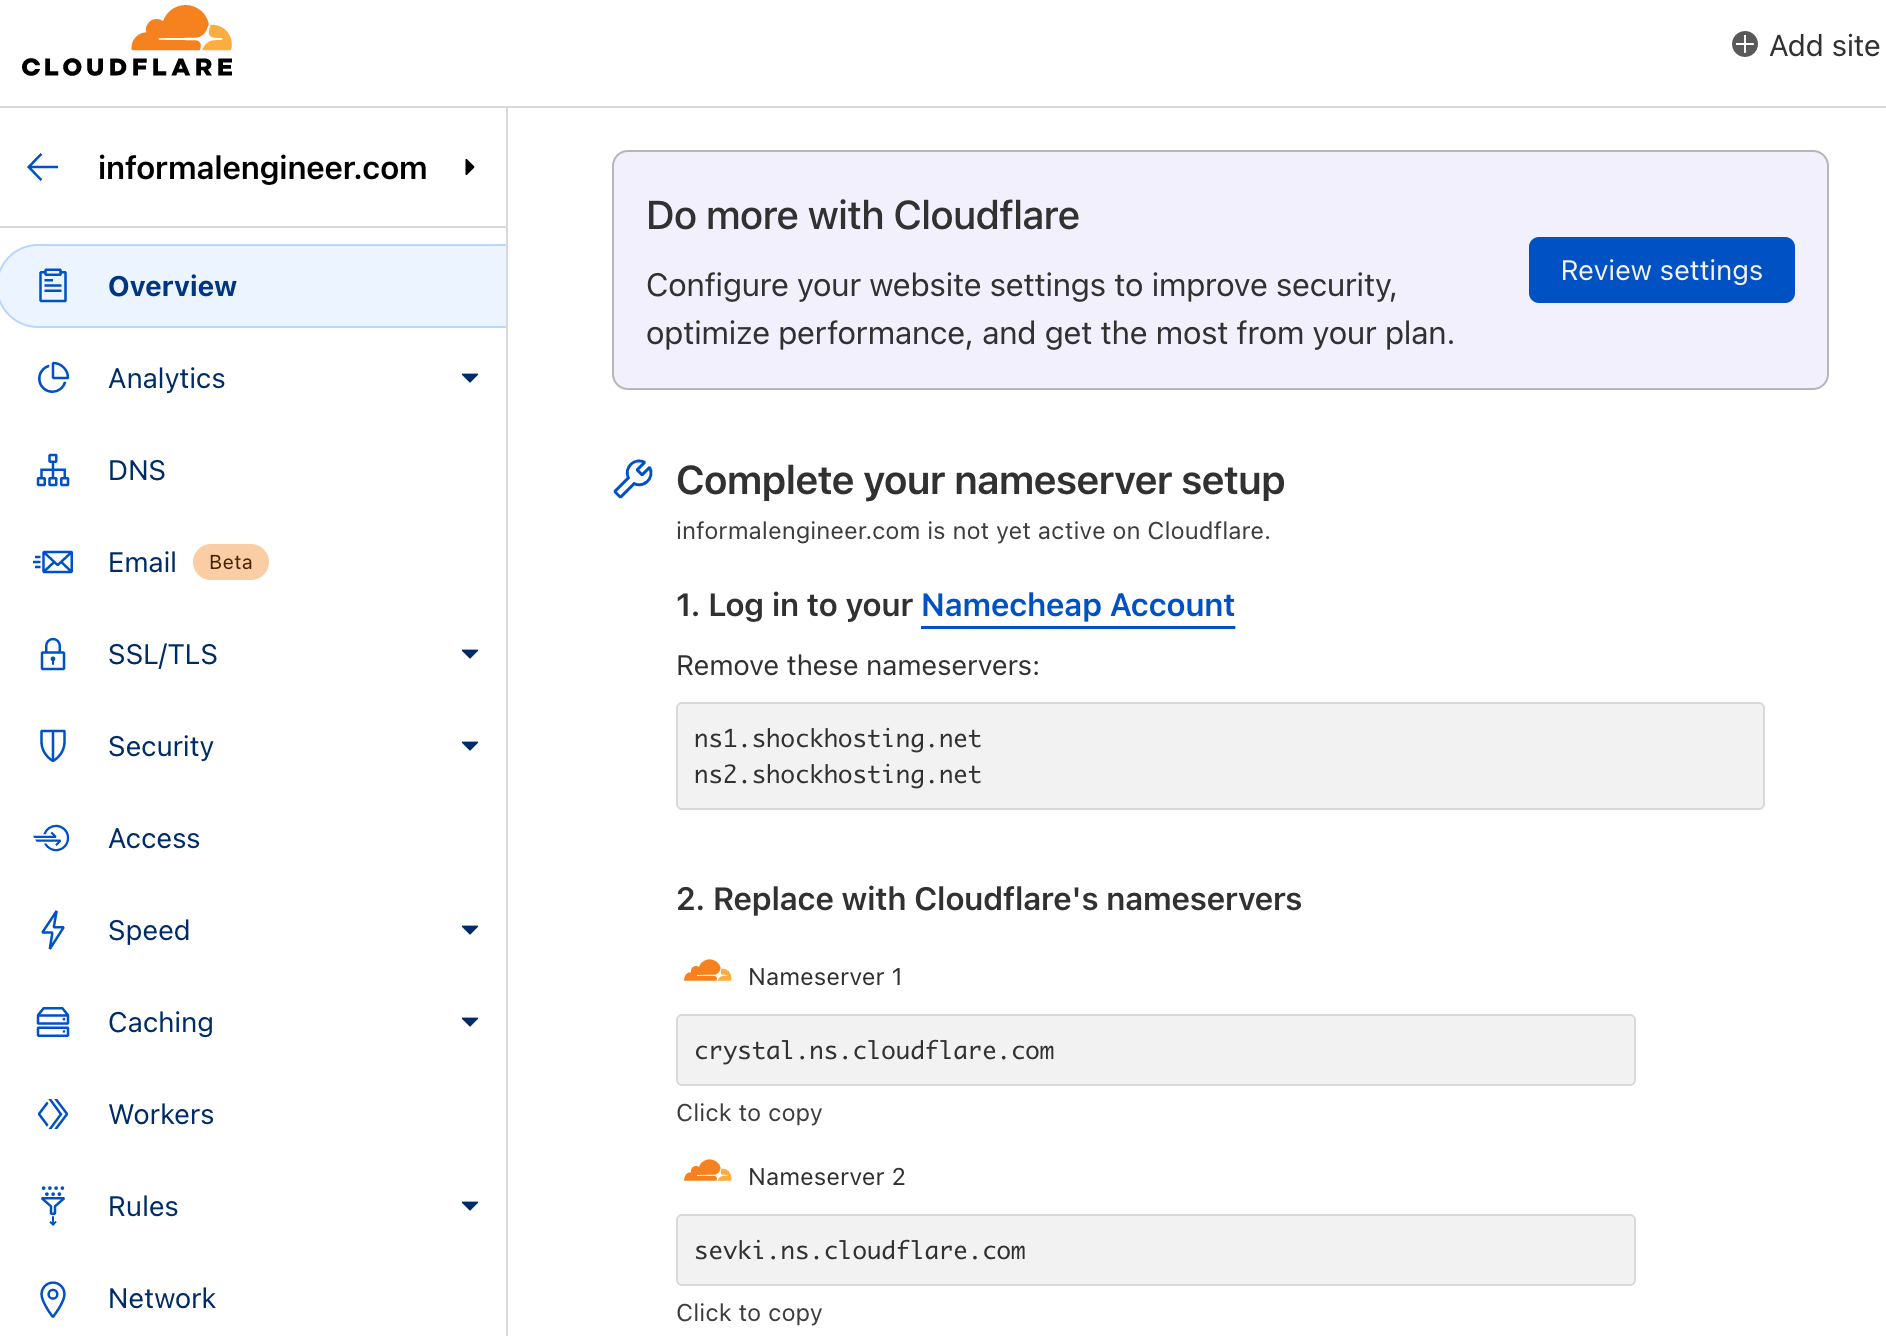
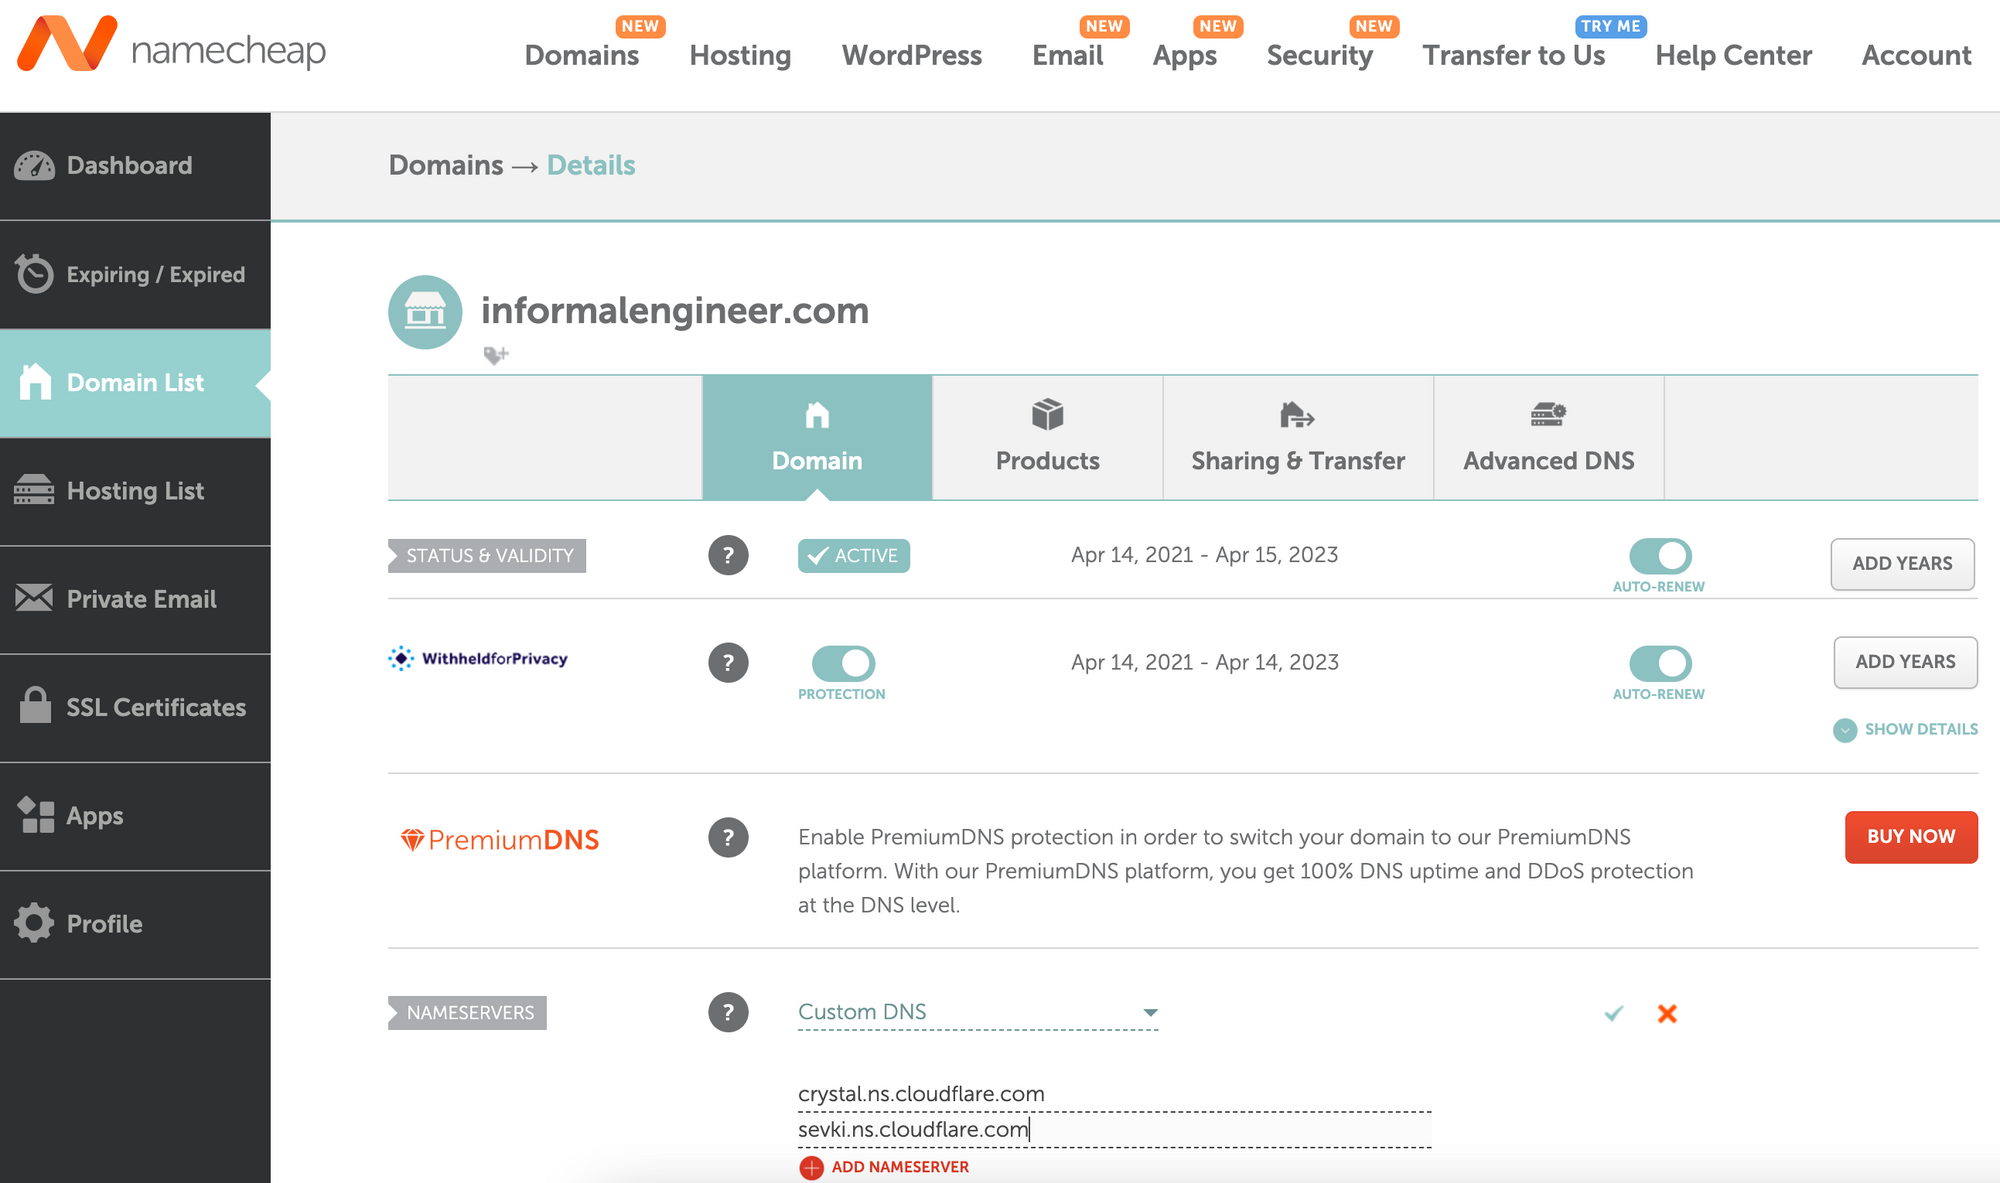
So in your Namecheap account, you can navigate to manage the domain you just registered and add the Cloudflare name servers as shown below: (Don't forget to save)
While we wait for the name servers to propagate, we can get started with getting the digital ocean account and droplets set up.
Digital Ocean - Host Server
Create a Digital Ocean account. If you are a student I recommend checking out the GitHub Student Developer Pack, specifically the intro to web developer package. If you have a student email that is associated with Github you should be able to utilize the following deal:
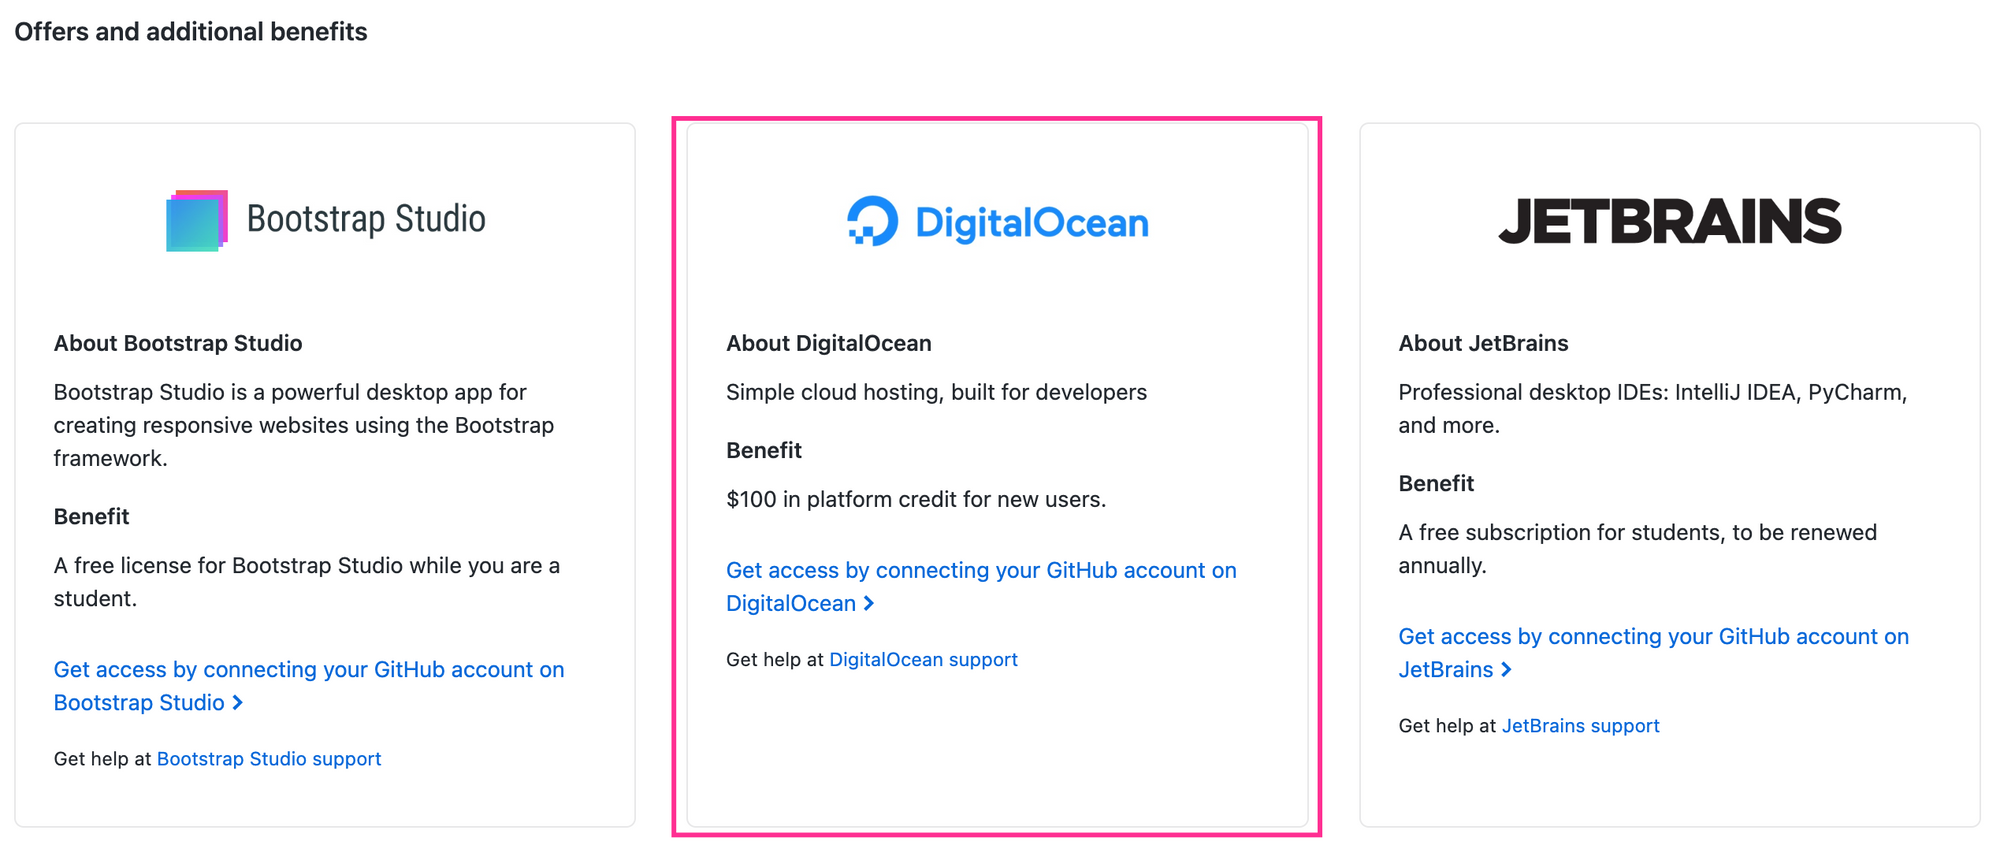
There are plenty of other amazing offers such as Canva Pro free for 12 months, I absolutely recommend you check this amazing resource out.
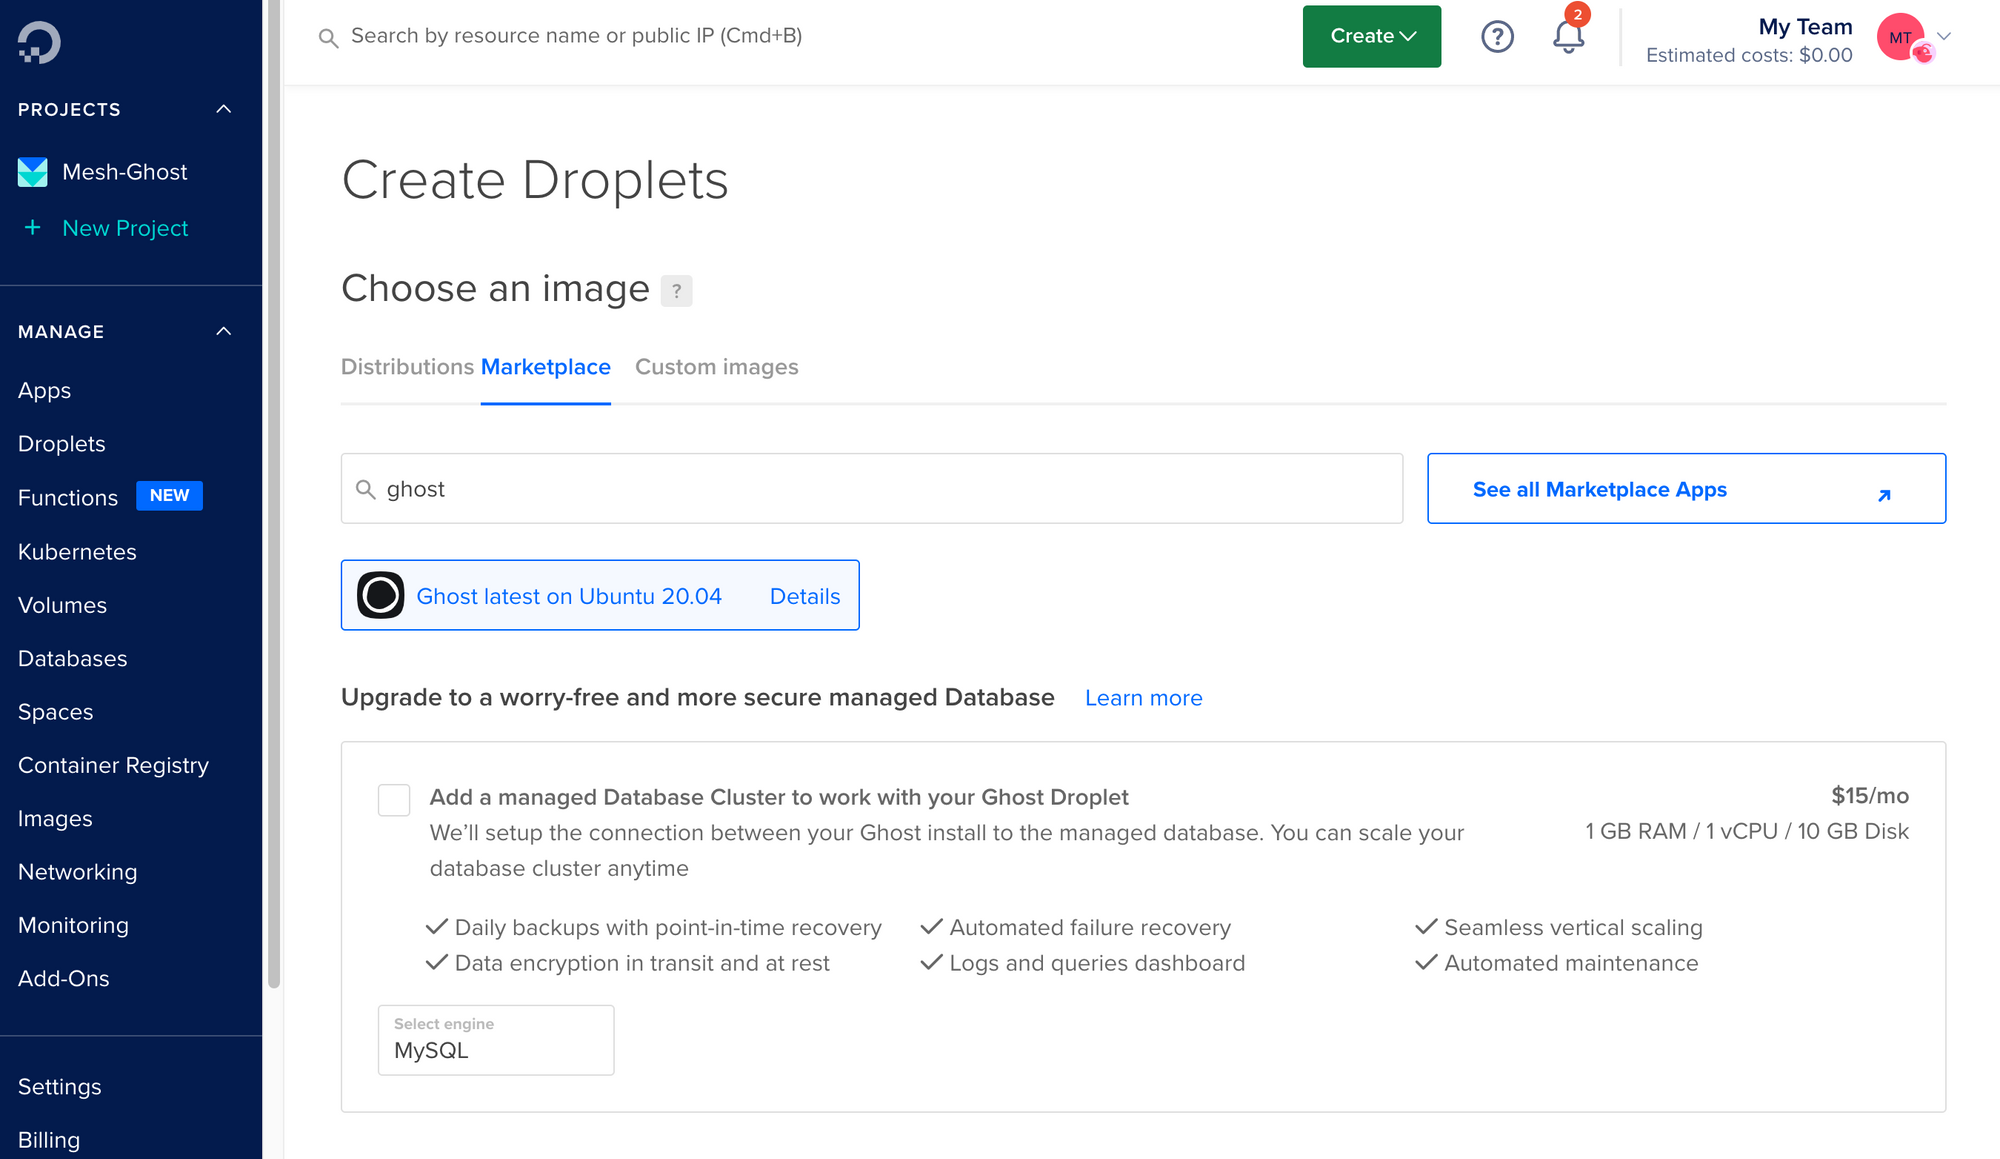
Okay, back to Digital Ocean, create a project and create a droplet within that project.
Instead of using Digital Ocean's over the counter distributions, you want to go to marketplace and search for Ghost and proceed the rest of the installation with that selected.
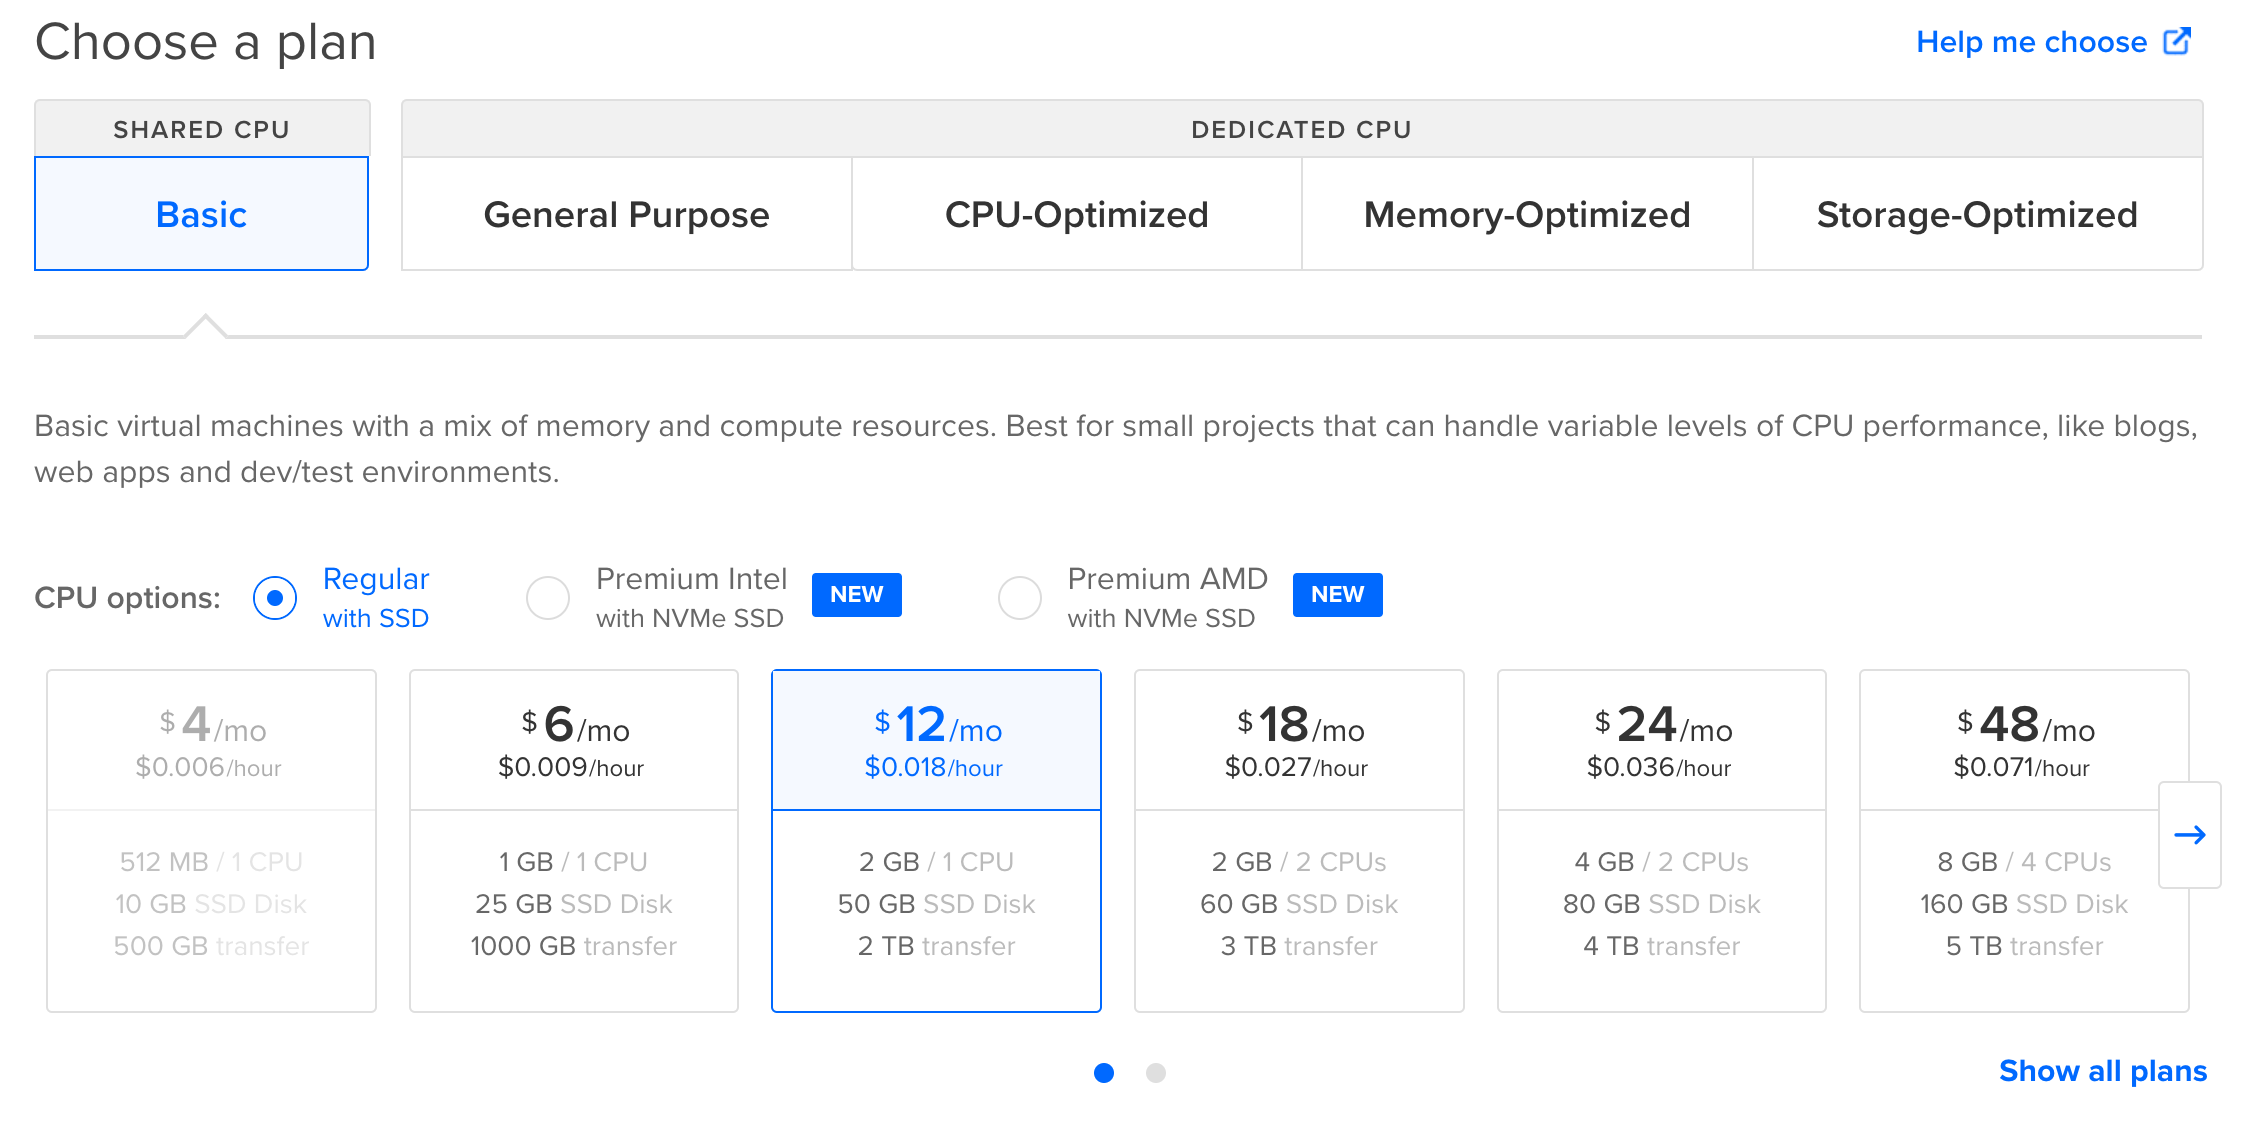
For the plan, you can go with the smallest plan available at ($6). However, going with 1GB ram is insufficient for updates and will require you to upgrade to the 2GB ram CPU whenever you want to update your Ghost distribution. So personally, I am going with the ($12/mo) option.
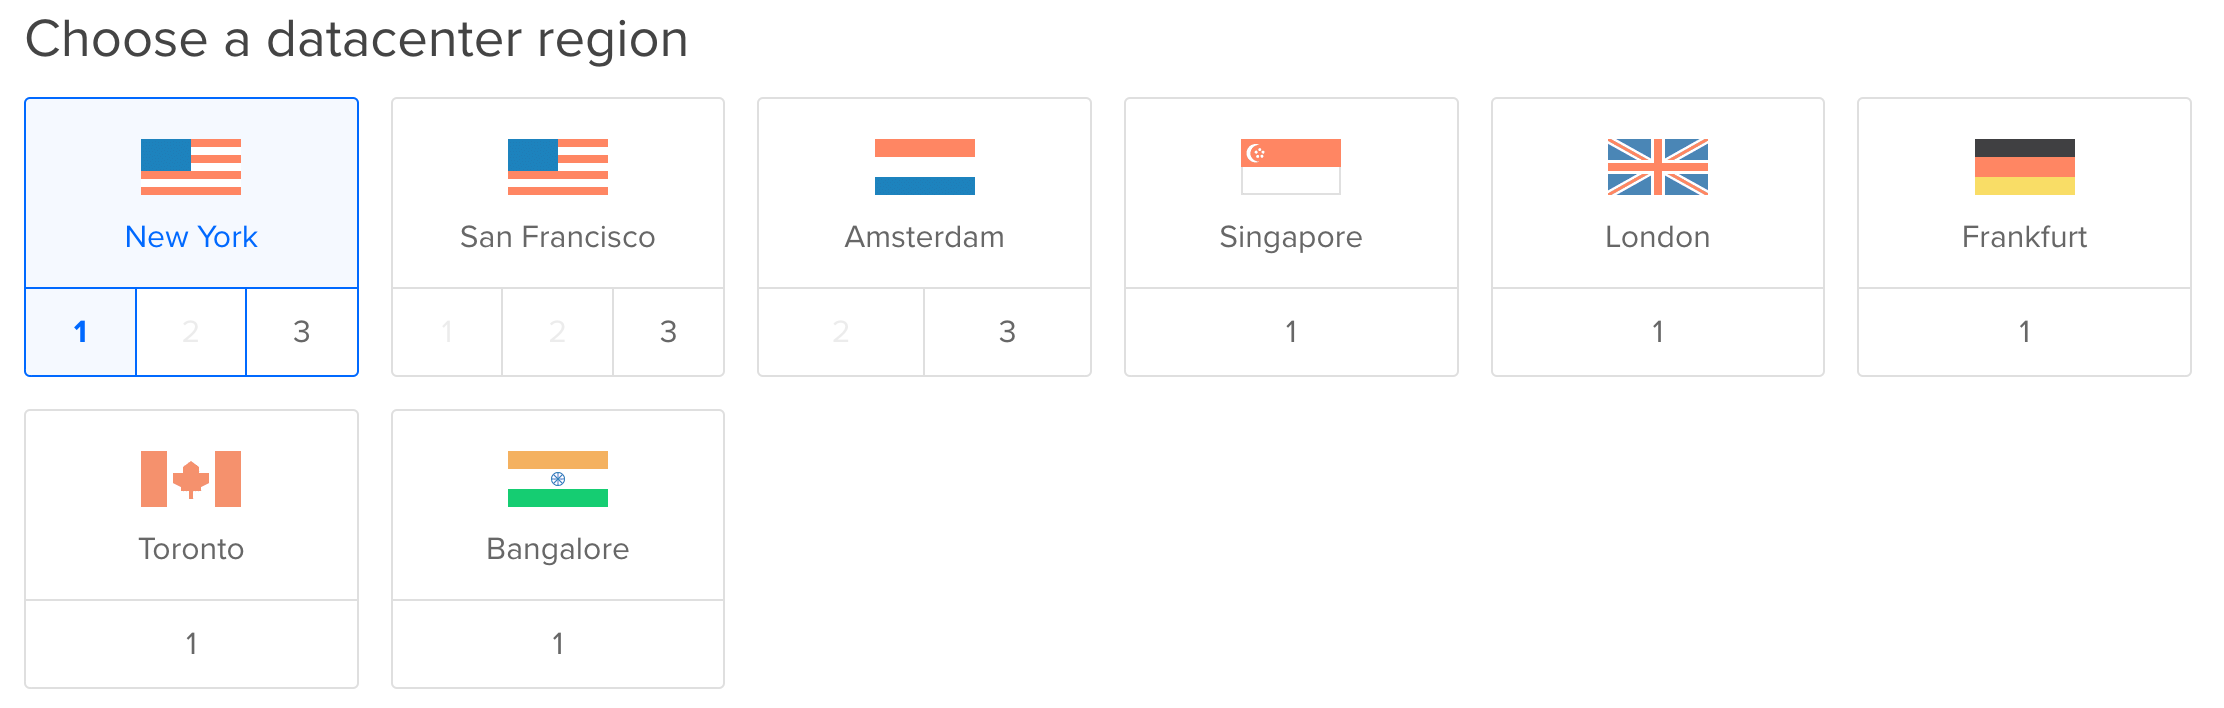
For the data centre locations, choose whichever is closest to you.
Create an authentication password or SSH key if you are comfortable with that.
Once you create your droplet you want to add your domain here and point your CloudFlare DNS to the following IP on your Digital Ocean droplet.

So do not SSH into your IP yet.
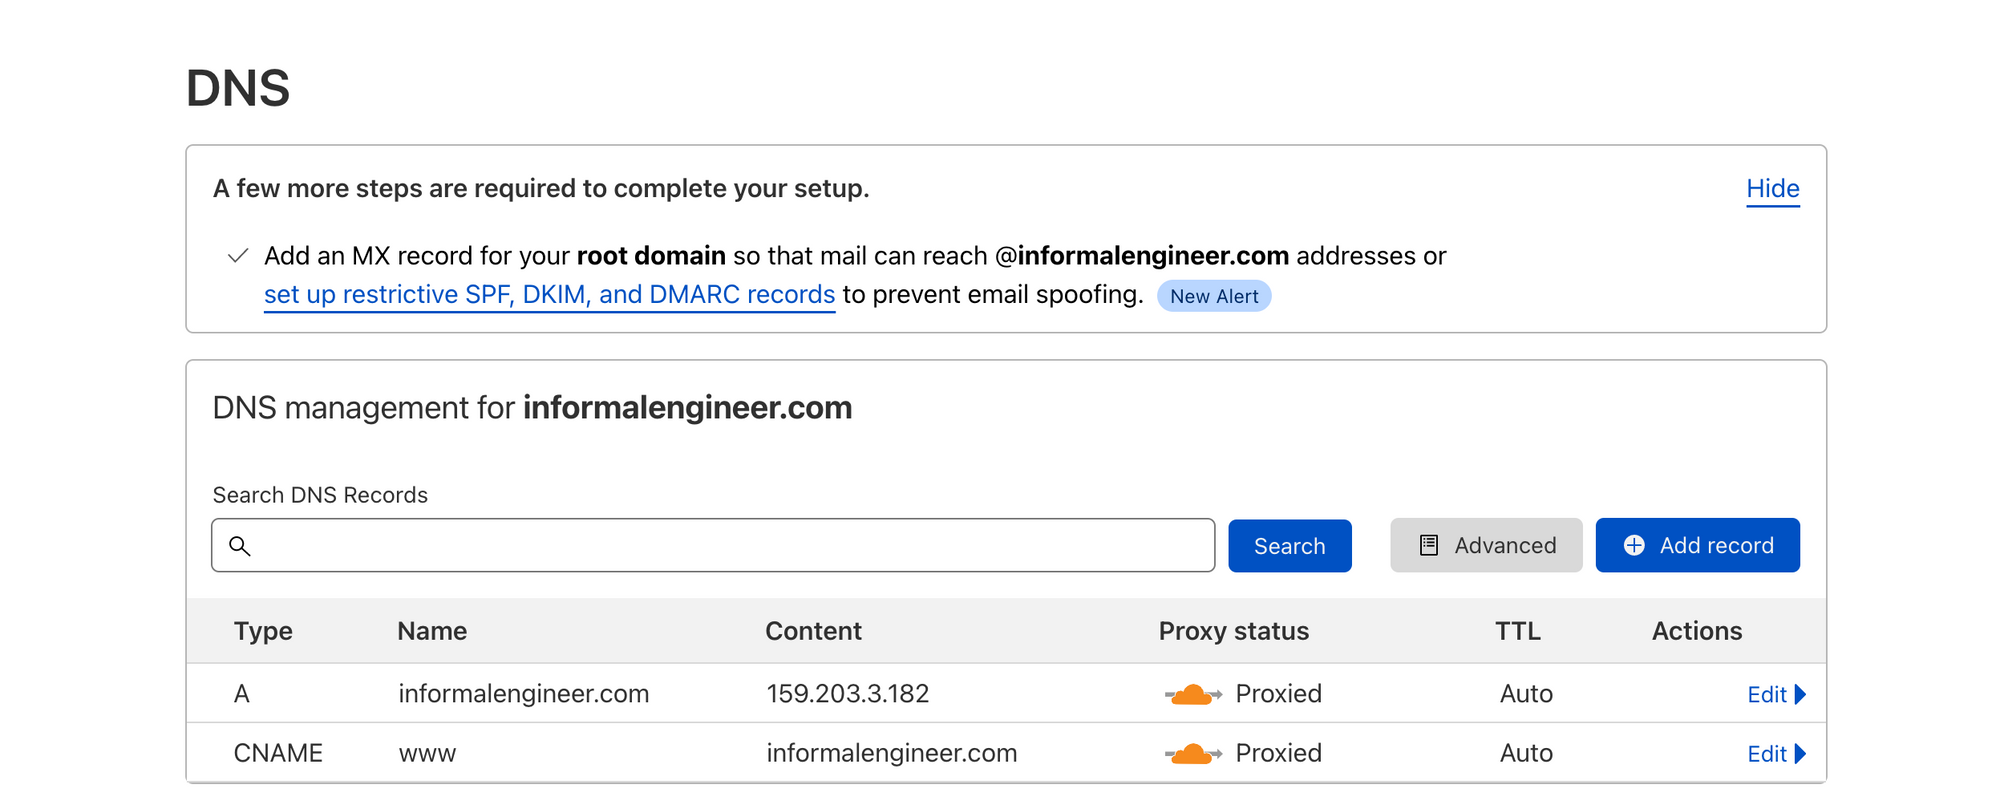
Go back to CloudFlare, navigate to DNS and we will have you add two records with the IP address that you received in the step prior to this.
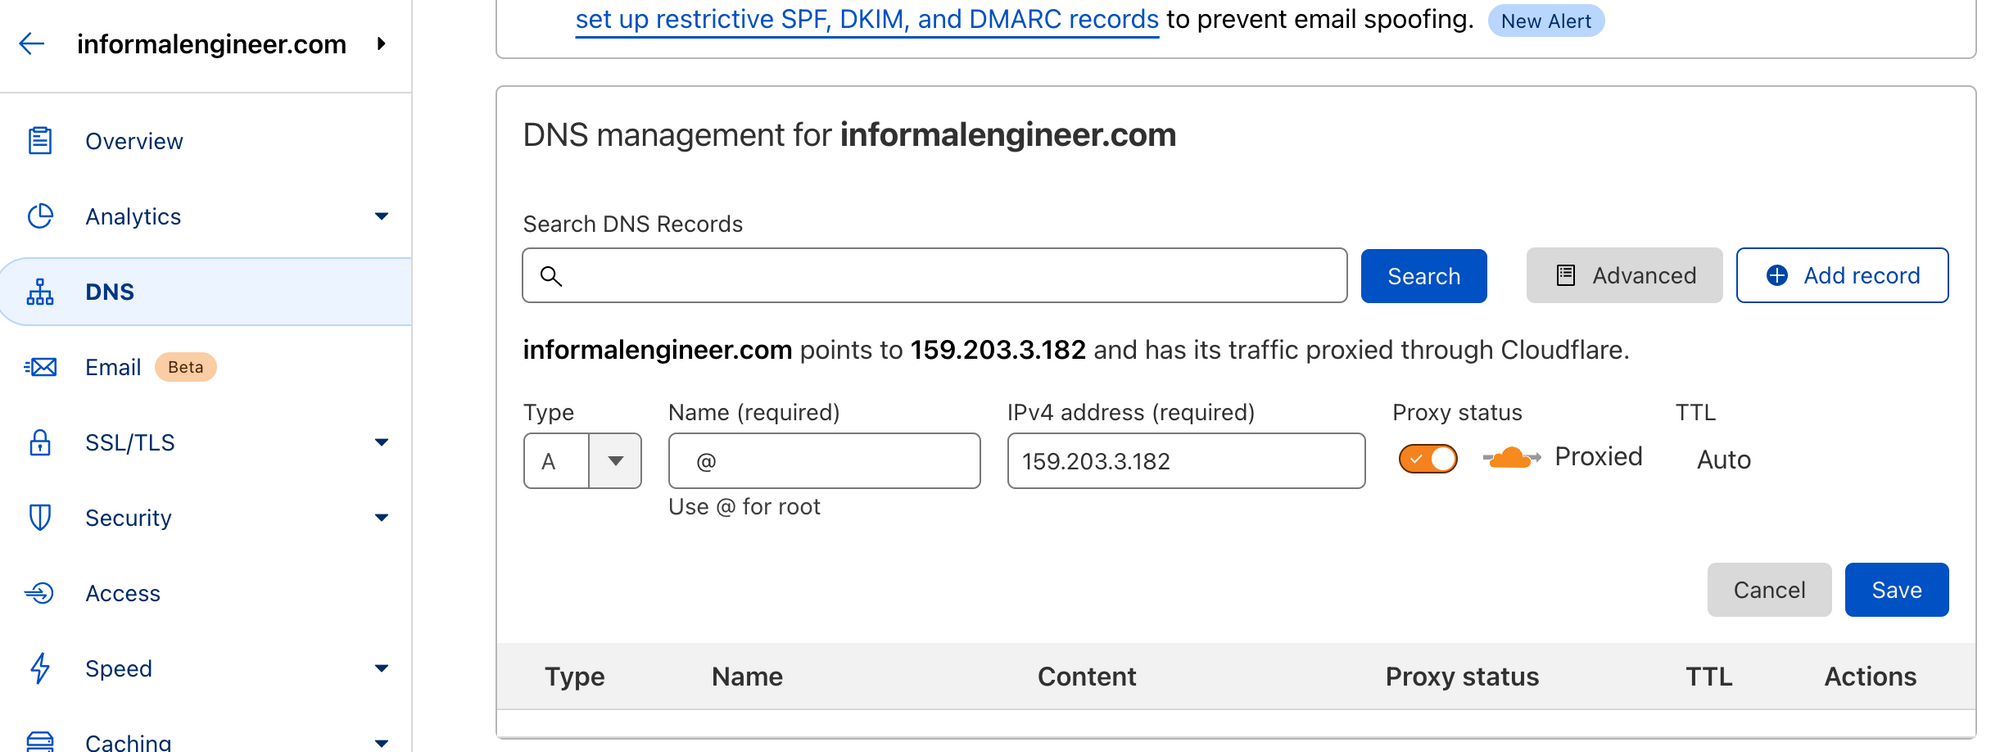
Additionally, you should also create a CNAME Record and have the name point to www.
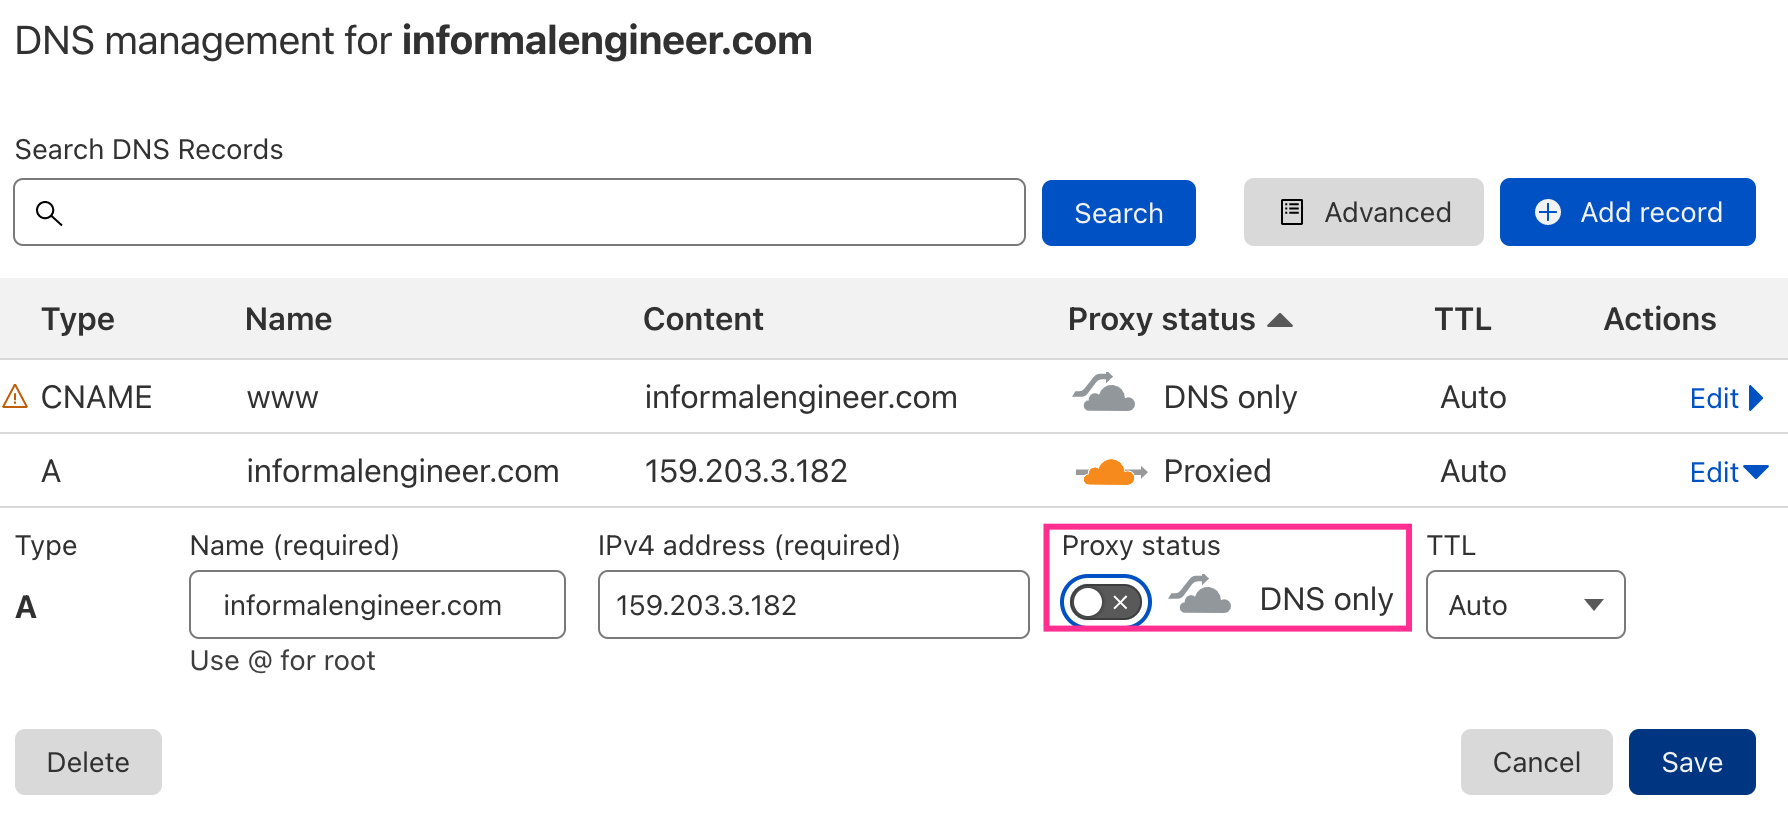
Once these are created, I suggest turning off proxy status for both the CNAME and the A DNS. I have run into a lot of issues getting the initial bit set up without them turned off, you can turn it back on when your website is up and live.
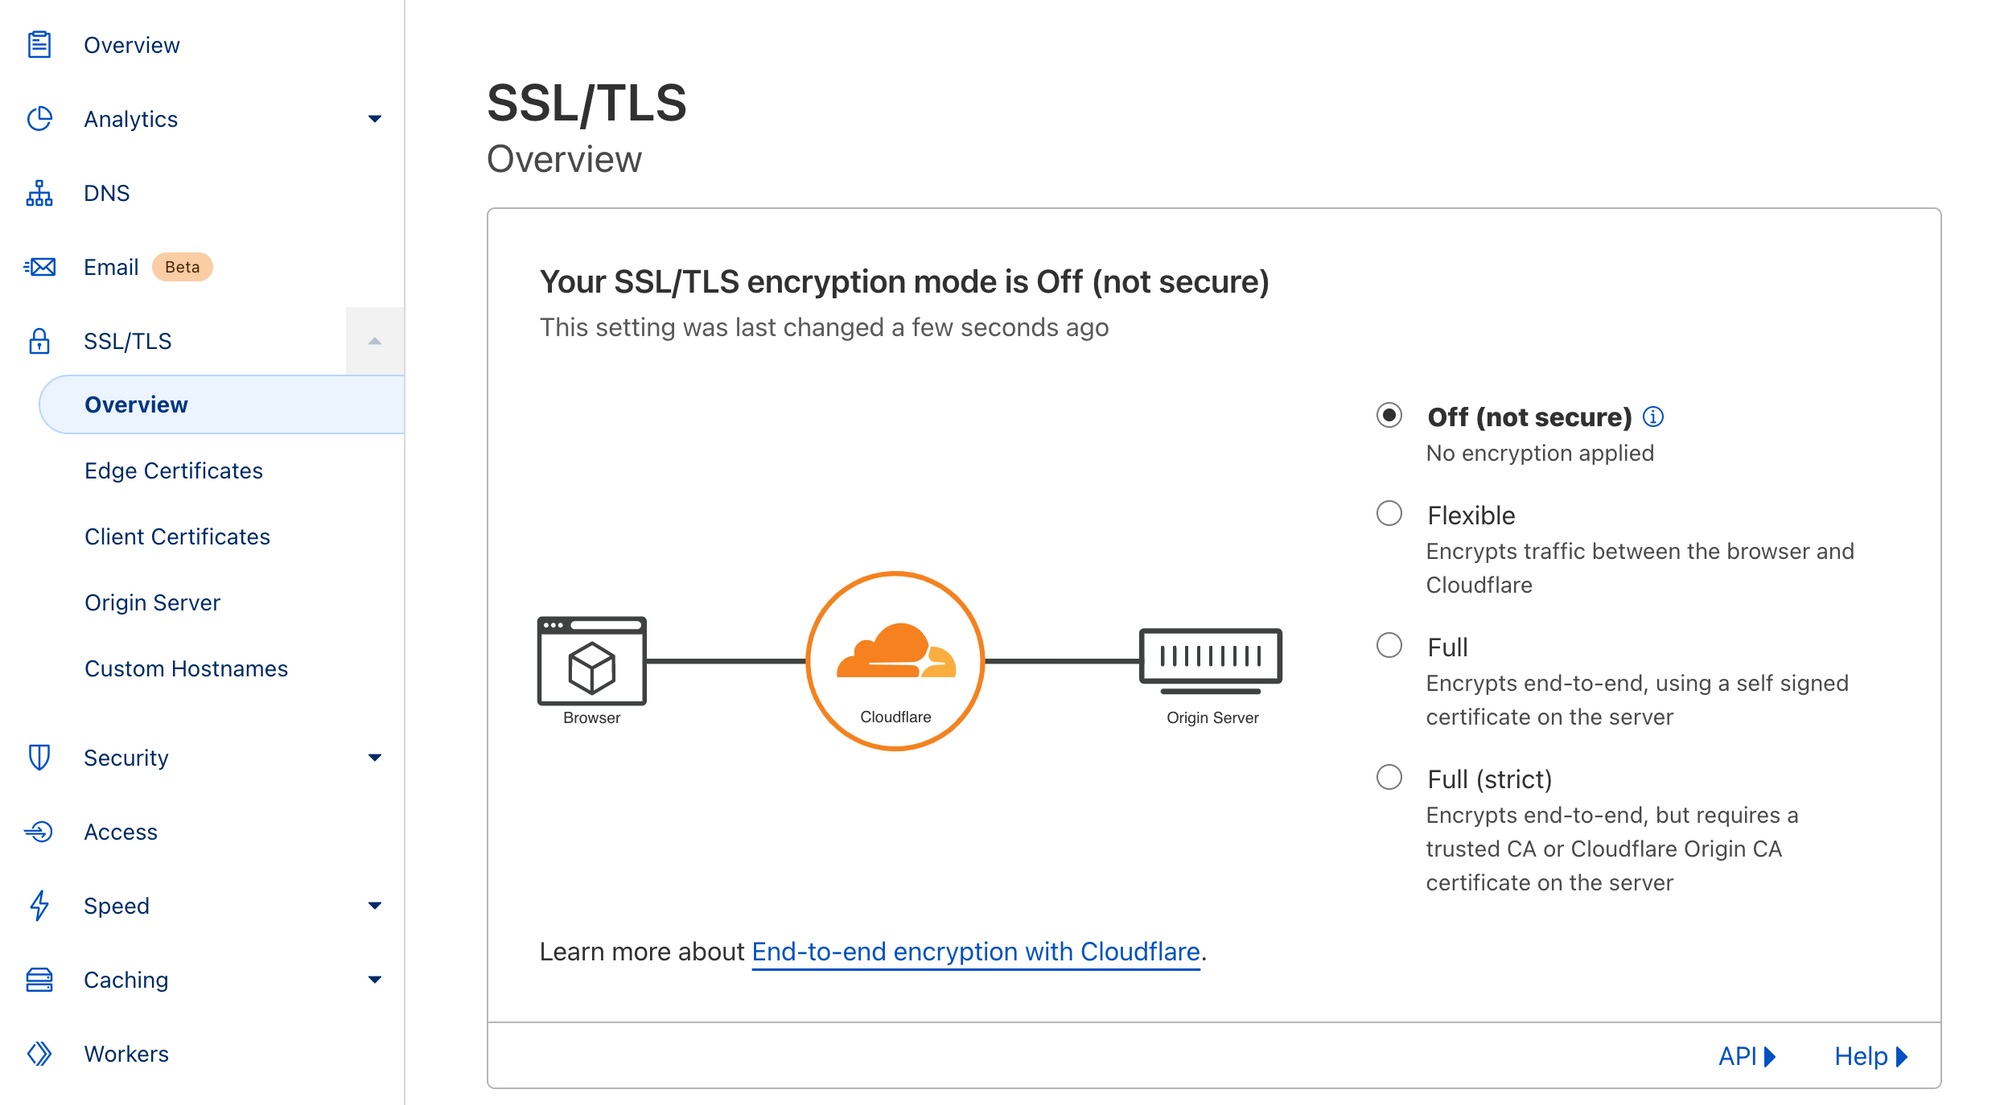
Navigate to SSL/TLS and select encryption mode as Off.
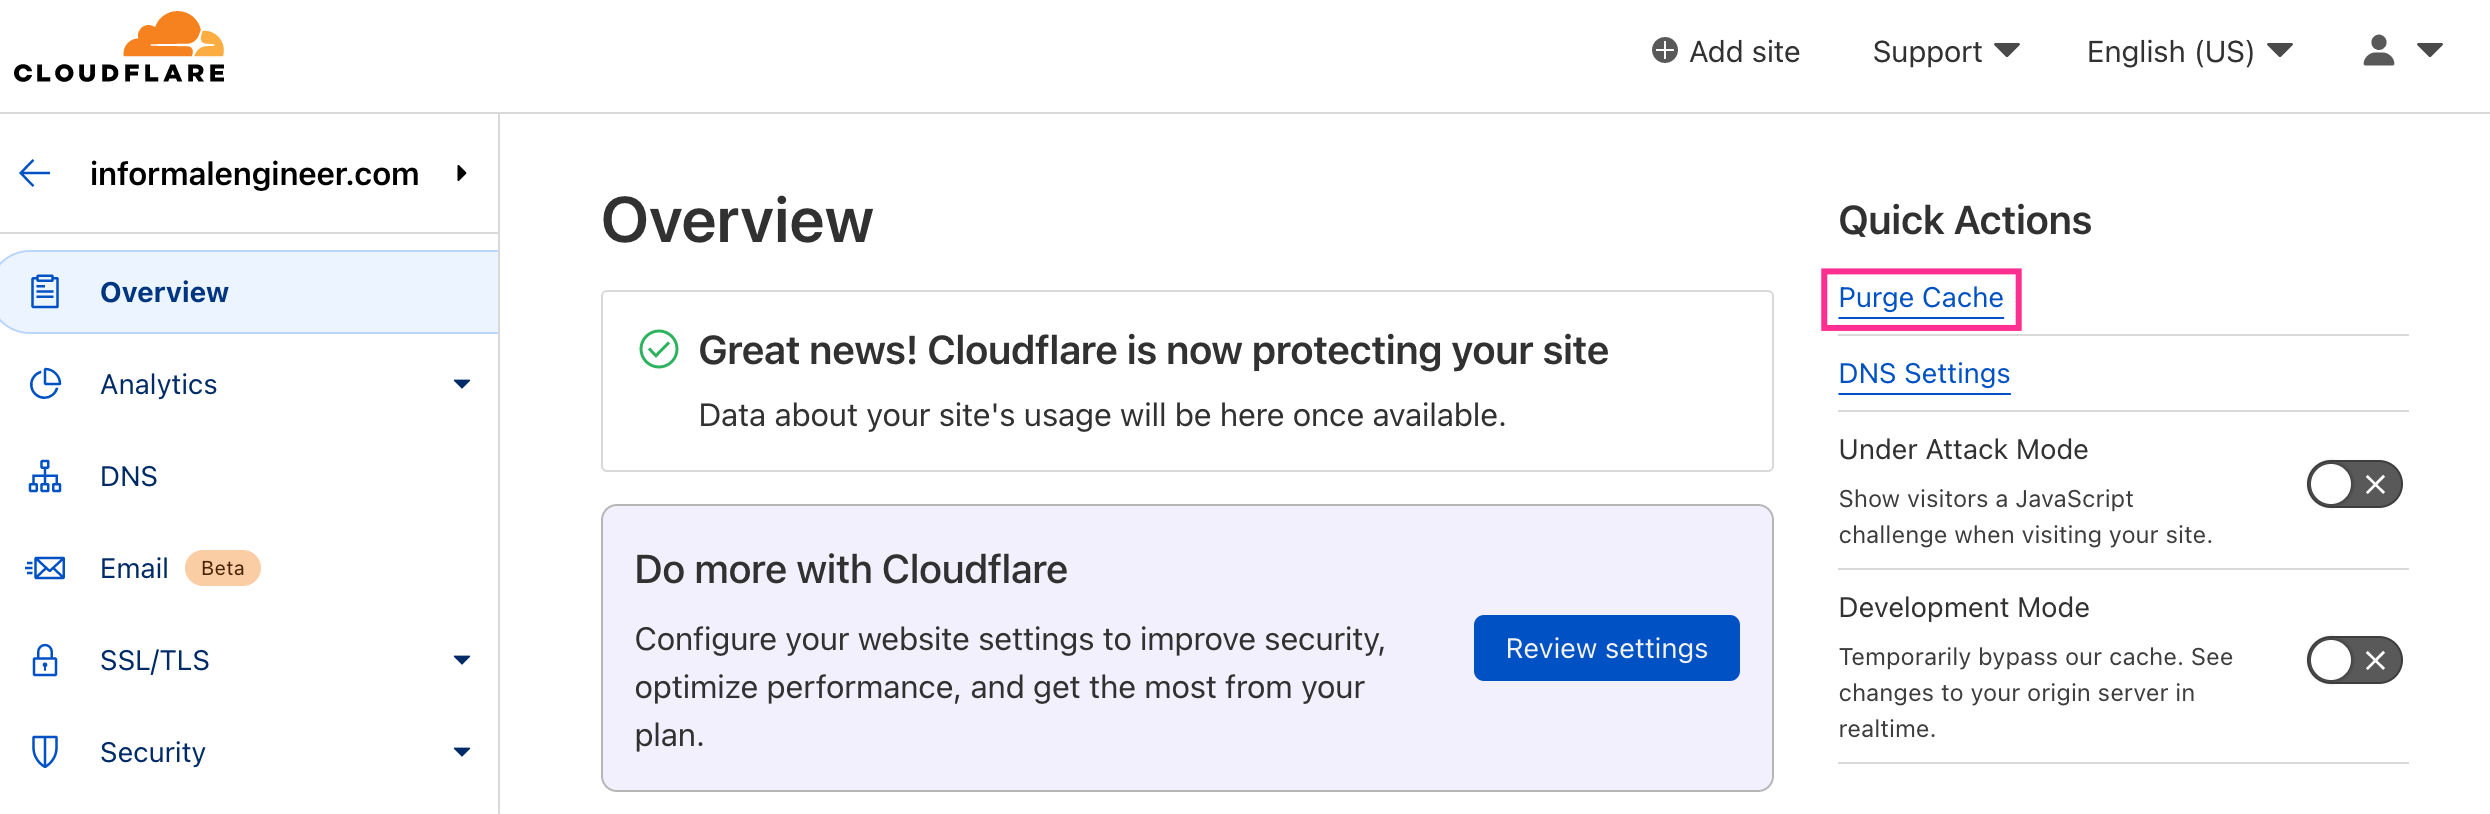
I suggest going to the overview page of cloudflare and purging the cache. Purging everything should be sufficient.
Perfect, we will set up a few other things like SSL later on. For the time being go back to your digital ocean and you will see a get started with ghost button next to your droplet, follow that prompt.
Going forward, I will be using the terminal on MacOS, but you can also use power shell or PuTTY on windows.
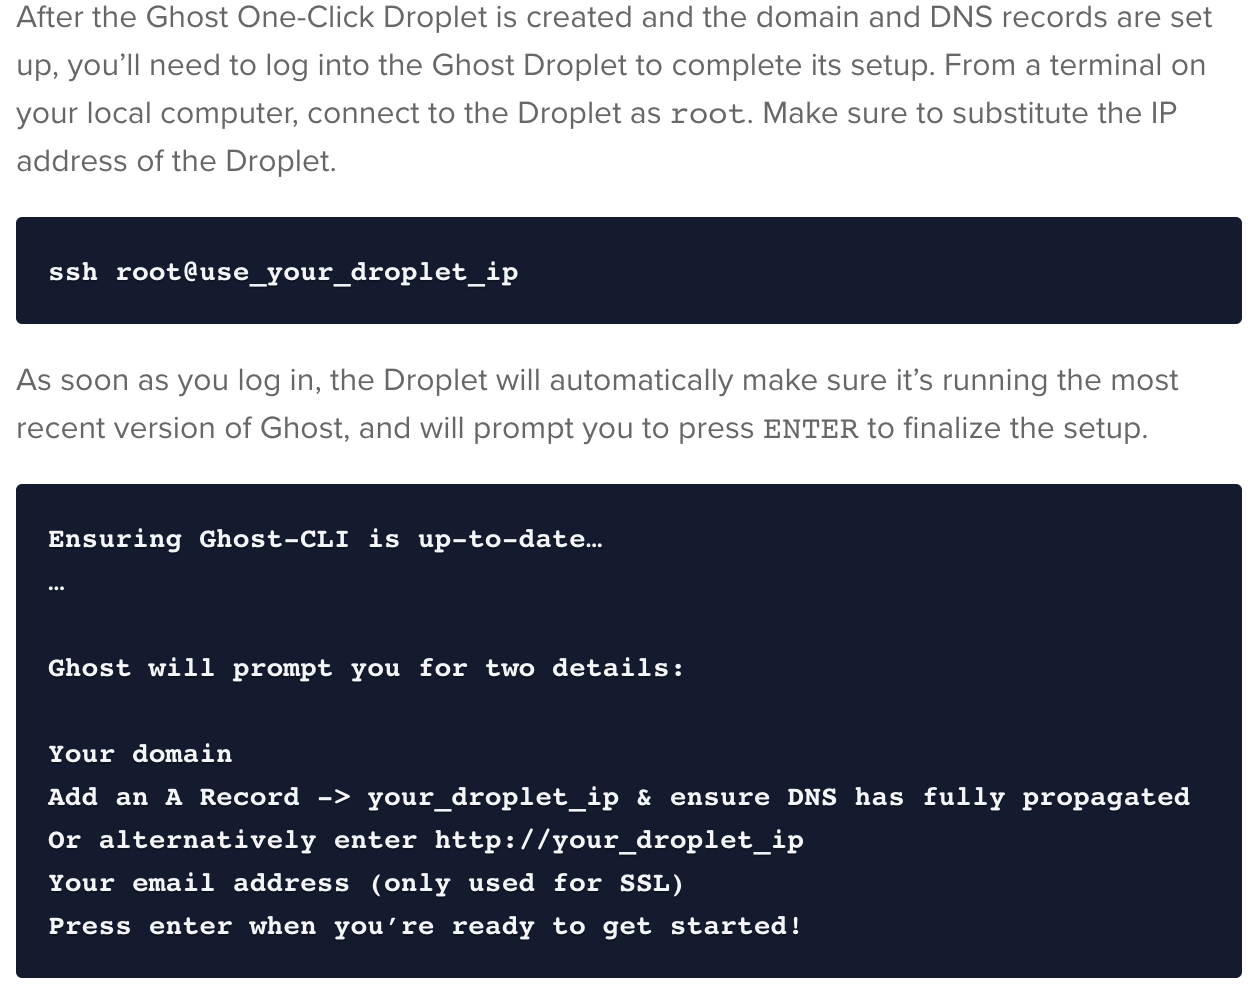
Once the terminal is done with the 1-click loading, you will be required to press enter, before you do so, you want to make sure that the IP of your site and the Domain name of your site brings you to this page:
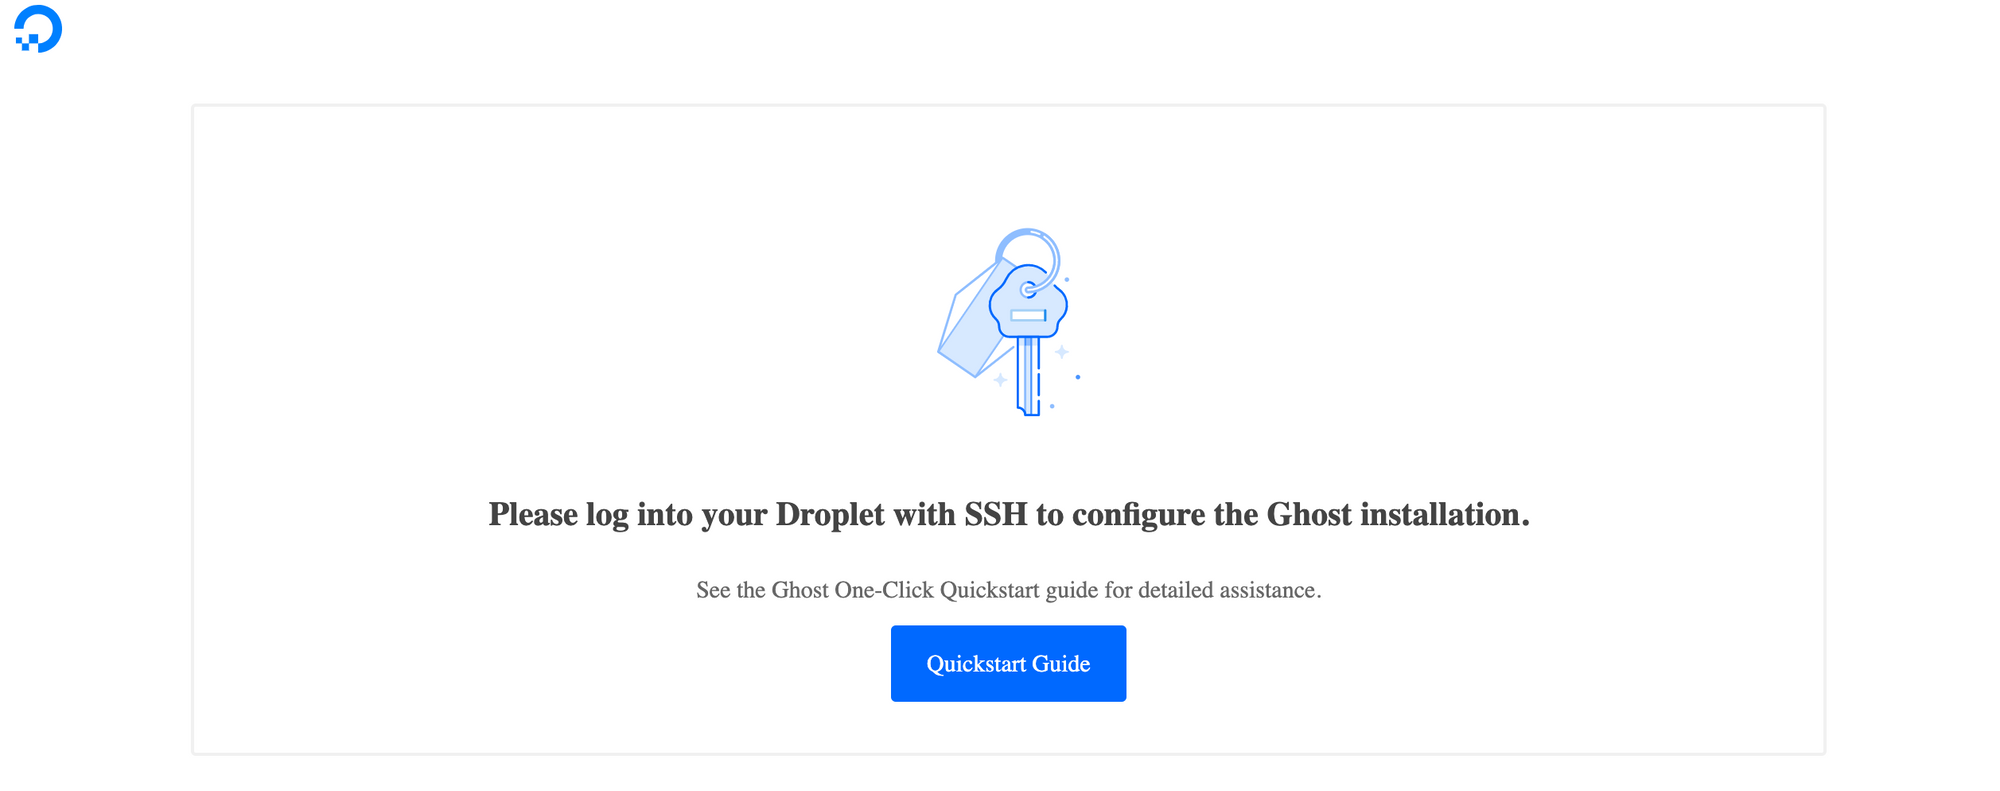
Once this is the page you get to with your domain, press enter on terminal and let the fun start.
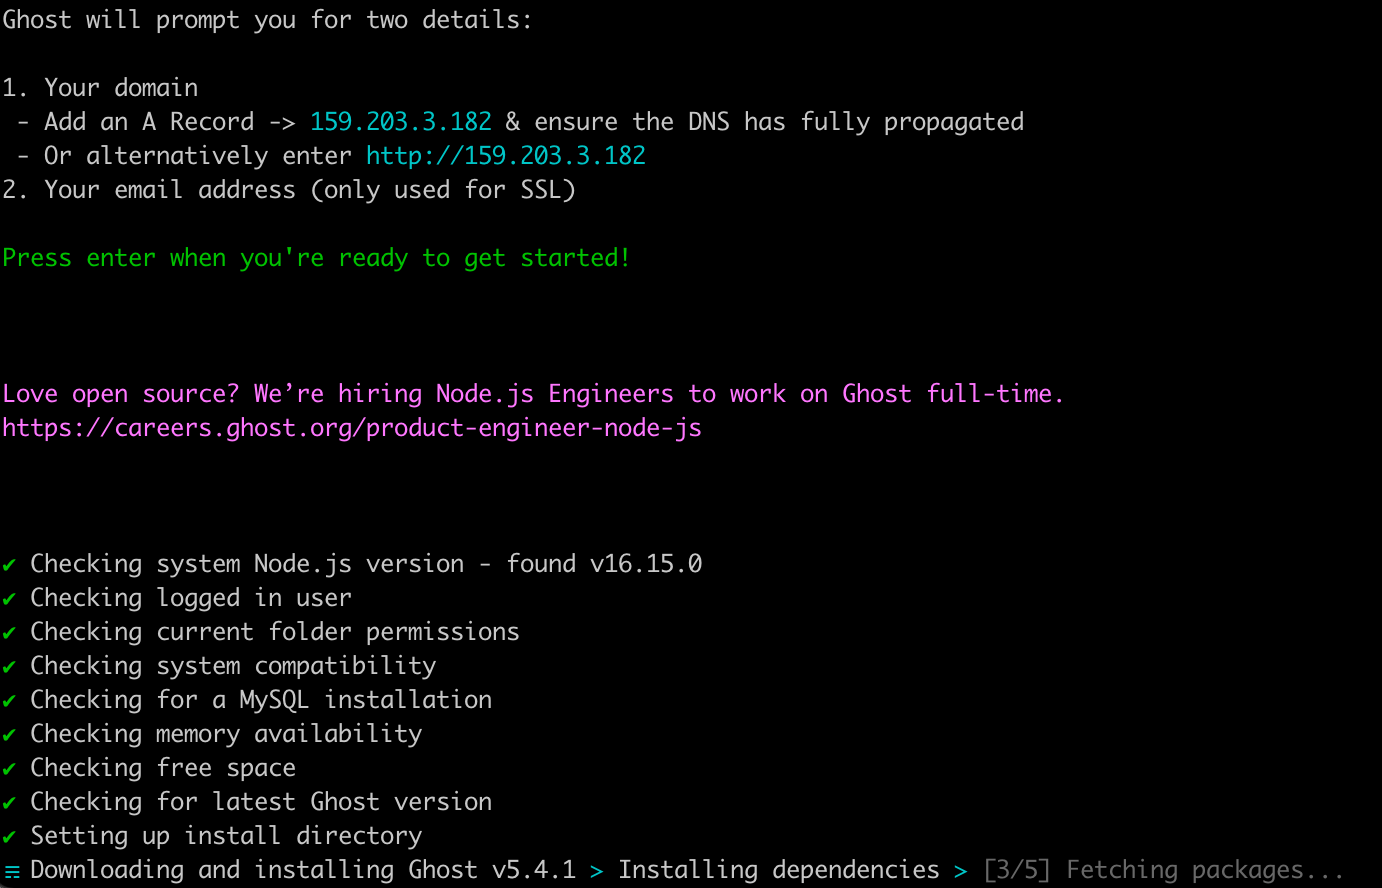
Just follow the prompts for your blog URL and email address.
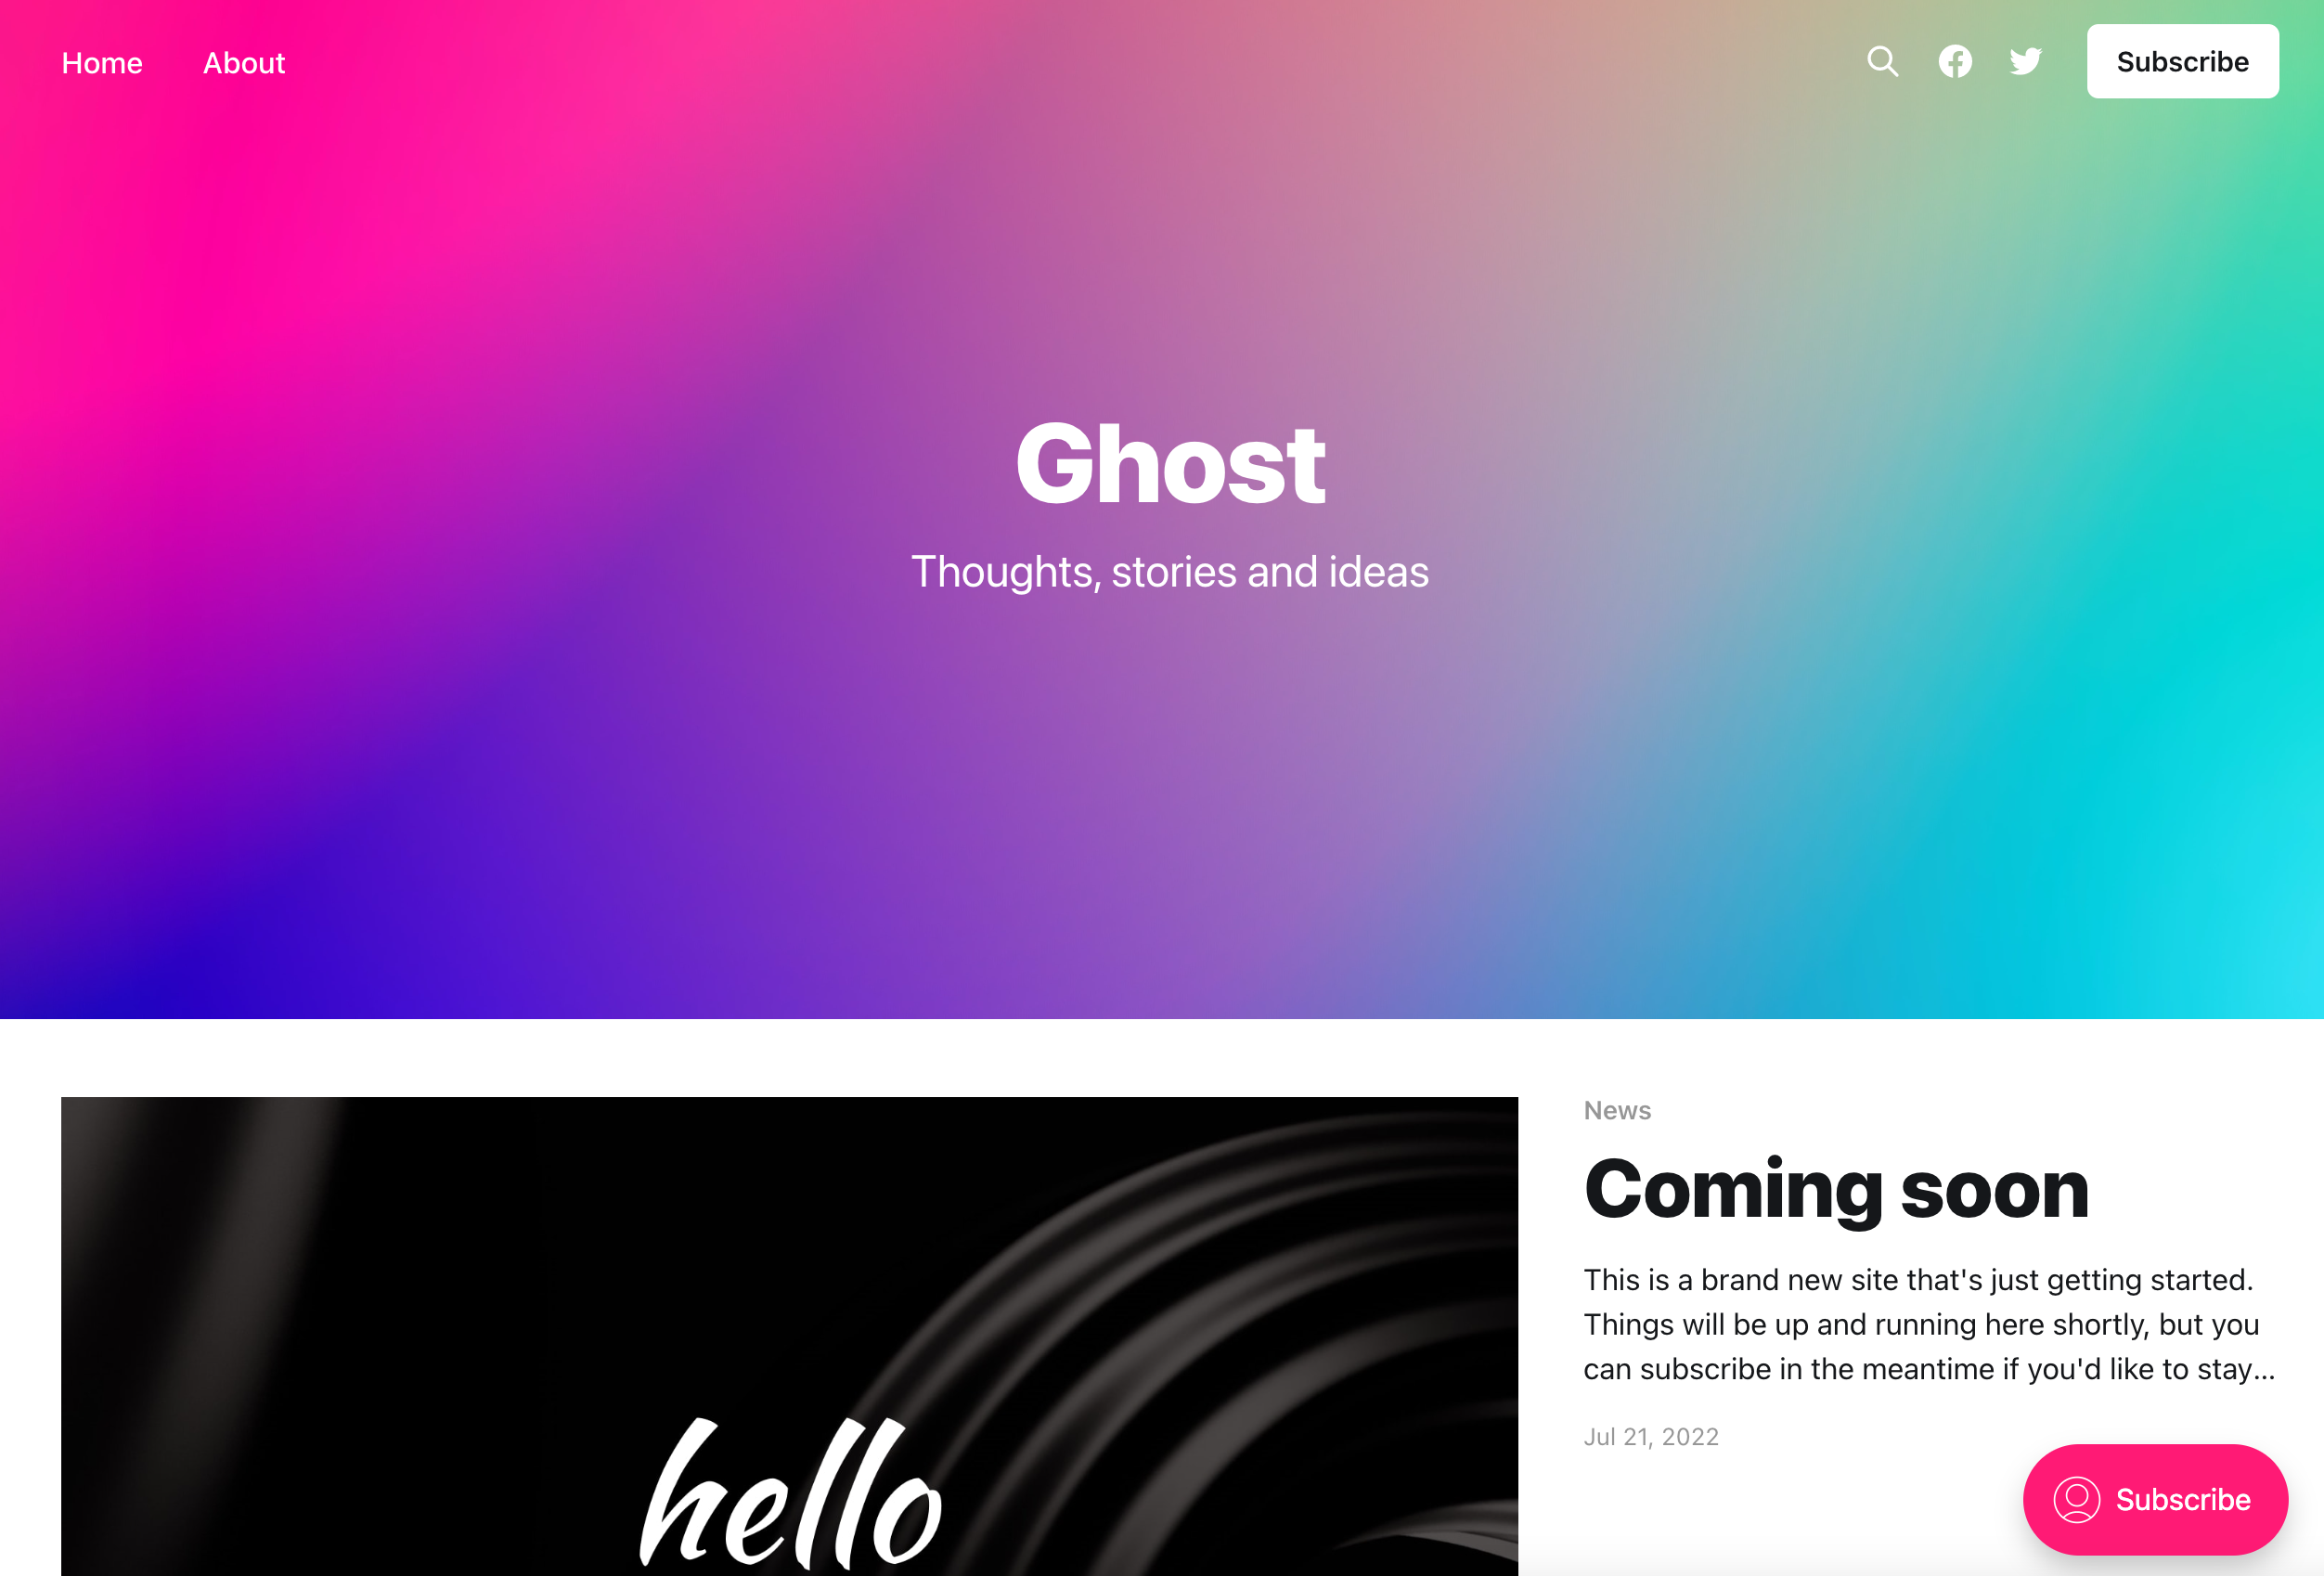
When you get to this page, you are good to go, welcome to your new ghost site!
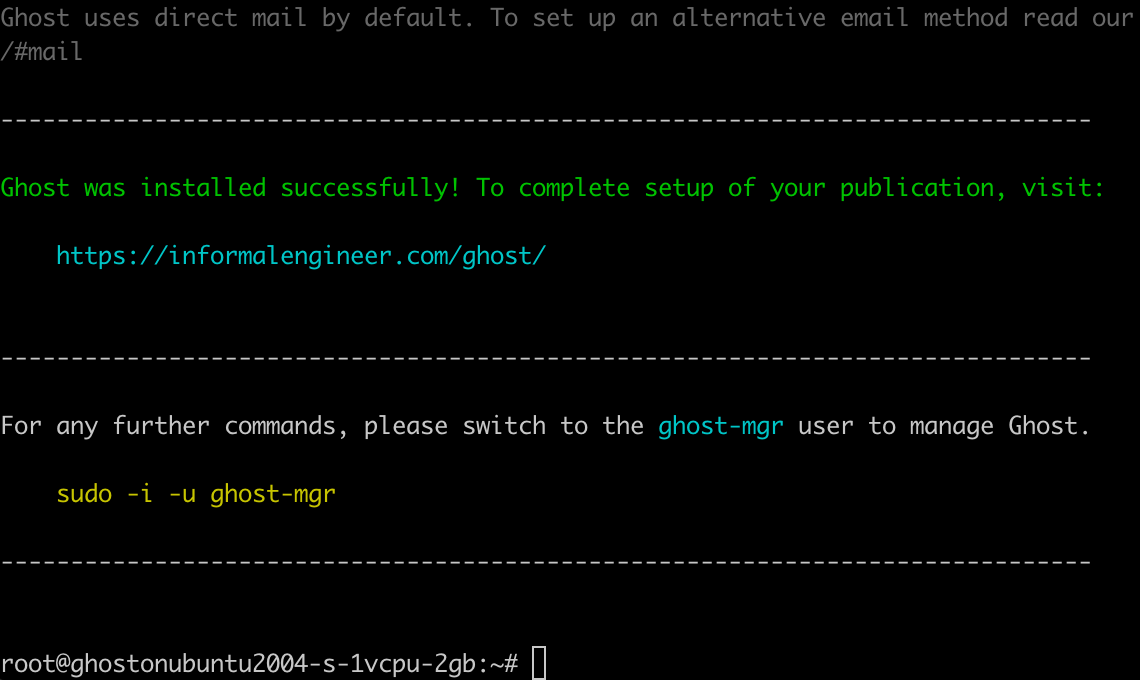
Once all that is complete, your website should be live!
Let's get SSL set up with Cloudflare, if you were building your site without Cloudflare, you could just ignore this part.
First you will need to create a SSL Origin Certificate:
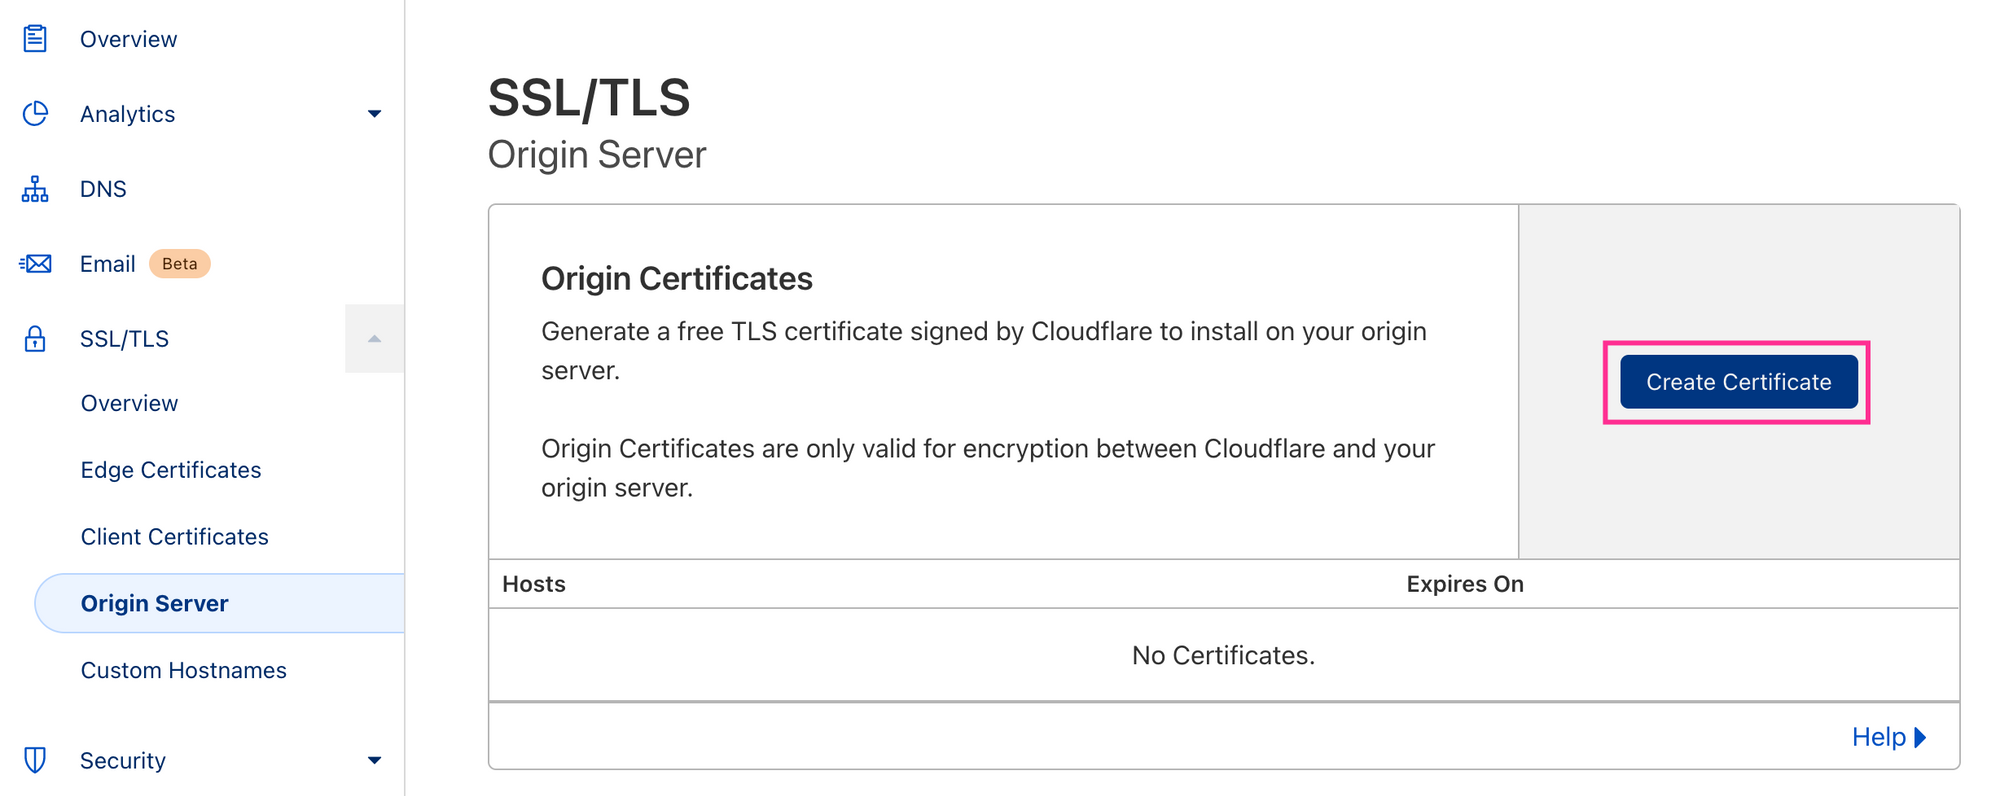
Once you create the certificate, I like to first SSH into my server, and make sure I change the user to ghost-mgr.
sudo -i -u ghost-mgr
CD into the /etc/ssl/ directory. Then create a directory with your website address as the name.
cd /etc/ssl/
sudo mkdir yourdomain.com
cd yourdomain.com
You are going to create two files in this directory.
sudo nano yourdomain.com.crtPaste in the origin certificate that you just created on Cloudflare. Press CTRL-X then Y to Save it. Then we are going to create another file.
sudo nano yourdomain.com.keyCopy the private key in there and save it the same way as we suggested above.
If you do an ls command in your folder, you should find the following.

Time to configure your ghost NGINX Server Block.
By this point, you might be sitting here thinking, why would anyone do this over getting the GhostPro subscription service. You would be correct in thinking this is a tutorial for the select few who enjoy complications in their lives.

You will want to nano your configuration in the following location:
sudo nano /etc/nginx/sites-available/yourdomain.com-ssl.confThis is what you will see:
server {
    listen 443 ssl http2;
    listen [::]:443 ssl http2;

    server_name yourdomain.com;
    root /var/www/ghost/system/nginx-root; # Used for acme.sh SSL verification (https://acme.sh)

    ssl_certificate /etc/letsencrypt/yourdomain.com/fullchain.cer;
    ssl_certificate_key /etc/letsencrypt/yourdomain.com/yourdomain.com.key;
    include /etc/nginx/snippets/ssl-params.conf;

    location / {
        proxy_set_header X-Forwarded-For $proxy_add_x_forwarded_for;
        proxy_set_header X-Forwarded-Proto $scheme;
        proxy_set_header X-Real-IP $remote_addr;
        proxy_set_header Host $http_host;
        proxy_pass http://127.0.0.1:2368;

    }

    location ~ /.well-known {
        allow all;
    }

    client_max_body_size 50m;
}
You want to direct your ssl_certificate and key to the files you created earlier, additionally, I would add the www.yourdomain.com and increase the body size to 100m.
server {
    listen 443 ssl http2;
    listen [::]:443 ssl http2;

    server_name yourdomain.com www.yourdomain.com;
    root /var/www/ghost/system/nginx-root; # Used for acme.sh SSL verification (https://acme.sh)

    ssl_certificate /etc/ssl/yourdomain.com/yourdomain.com.crt;
    ssl_certificate_key /etc/ssl/yourdomain.com/yourdomain.com.key;
    include /etc/nginx/snippets/ssl-params.conf;

    location / {
        proxy_set_header X-Forwarded-For $proxy_add_x_forwarded_for;
        proxy_set_header X-Forwarded-Proto $scheme;
        proxy_set_header X-Real-IP $remote_addr;
        proxy_set_header Host $http_host;
        proxy_pass http://127.0.0.1:2368;

    }

    location ~ /.well-known {
        allow all;
    }

    client_max_body_size 100m;
}
Save this file.
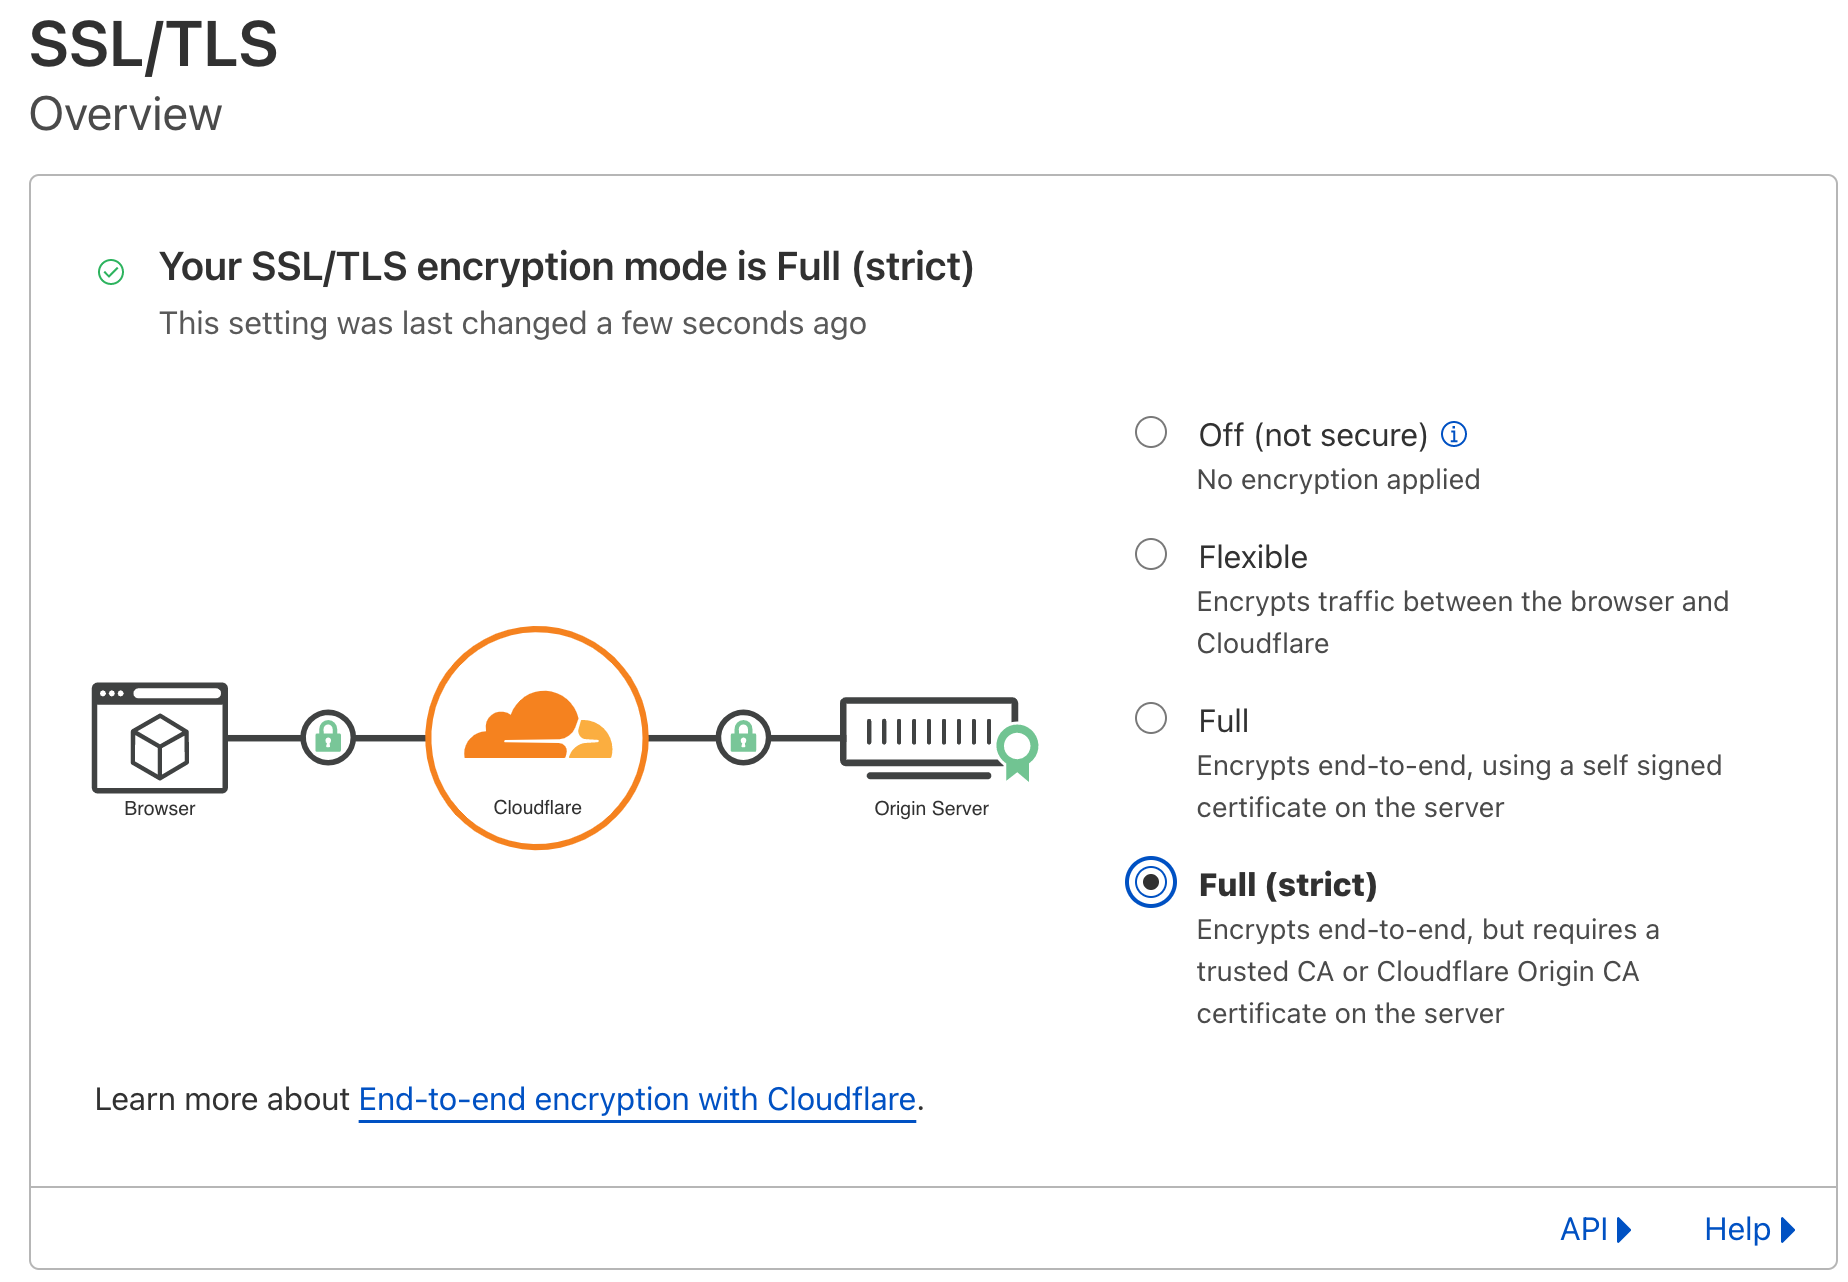
Go to your Cloudflare and change your SSL to Strict.
Back to your terminal, we are going to test the NGINX config.
sudo nginx -t
After you get a successful test result run the following command to restart NGINX.
sudo systemctl restart nginxFinally, back on CloudFlare, go into DNS and don't forget to turn on the proxy's for your website. Once you turn it on, don't forget to purge your cache.
With that, you are officially done! Your ghost website will serve users via CloudFlare SSL and you will not have to worry about the renewal of the certificate.
Congratulations! You have created a new Ghost Publication using Digital Ocean and CloudFlare.
If this tutorial helped you out, I simply ask you sign up for my newsletter, where you will get plenty of actionable advice to grow your passions!
I want to thank you for reading. If you need any assistance, please reach out to me on twitter @MeshRHM and I will do my best to help you out.